Kubernetes - rook-ceph 배포해보기
Kubernetes에서 PV(Persistence Volume)으로 사용 할 수 있는 rook-ceph을 배포해보았다.
Kubernetes v1.24.7 / Rook v1.10.10 / Ubuntu 22.04 LTS
Kubernetes
CLI
개요
rook-ceph은 k8s POD 간 사용할 수 있는 Shared filesystem으로 생각하면 된다.- 기본적으로 Ceph storage를 k8s에 사용하는 목적을 두고 있다.
- k8s에서
rook-ceph을 갖고 사용할 수 있는 방법은 3가지 정도가 있다.- Block Device(RBD) 1개의 pod에서 사용(RWO)
- Shared Filesystem(CephFS)는 Mutiple pods에서 사용(RWX)
- Object(RGW)는 inside and outside cluster에서 사용
- Ceph 구조 상 Quorum을 사용하여 구성된다.
- Quorum을 고려 했을 때 최소 k8s의 node는
master1대와worker3대 이다.
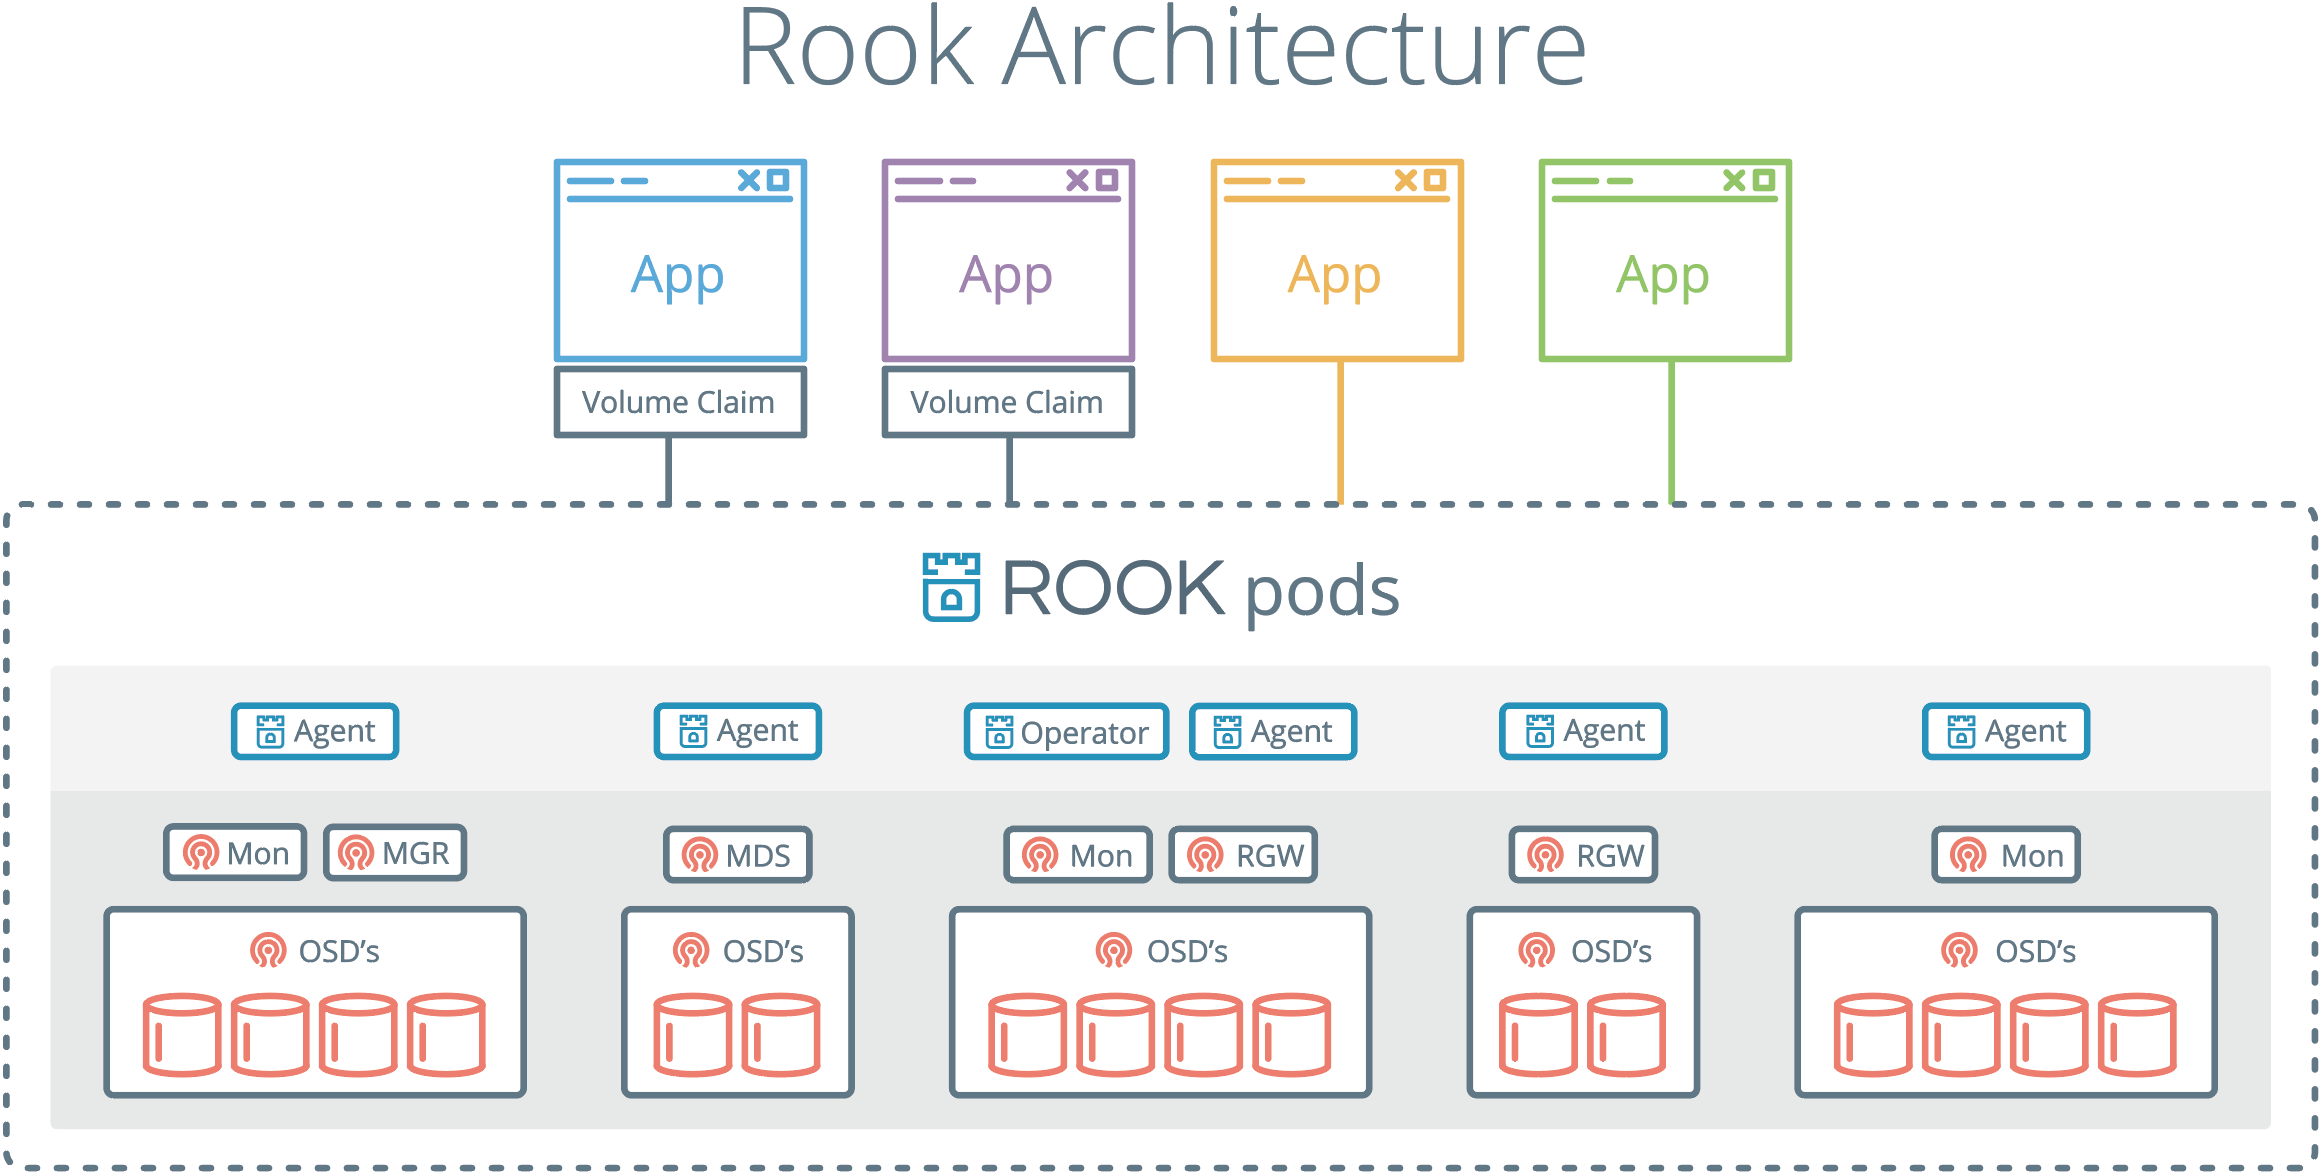 Rook Architecture
Deploy
Testbed
1
2
3
4
5
6
7
dor1@is-master:~$ kubectl get node
NAME         STATUS   ROLES           AGE   VERSION
is-master    Ready    control-plane   4d    v1.24.7
# 2 disk per for osd (all workers)
is-worker1   Ready    worker          4d    v1.24.7
is-worker2   Ready    worker          4d    v1.24.7
is-worker3   Ready    worker          4d    v1.24.7
설치는 다음의 링크를 참조하면 된다.
https://rook.io/docs/rook/v1.10/Getting-Started/quickstart/
crd.yaml나 common.yaml, operator.yaml는 base 항목이라서 딱히 건들 필요는 없어 TL;DR을 따라해도 상관이 없다.
다만, rook-ceph의 구성 변경이 필요하다면 clsuter.yaml의 항목을 수정 해 주면 된다.
1
2
3
4
5
6
7
# TL;DR
git clone --single-branch --branch v1.10.10 https://github.com/rook/rook.git
cd rook/deploy/examples
kubectl create -f crds.yaml -f common.yaml -f operator.yaml

# 필요 시 cluster.yaml 수정
kubectl create -f cluster.yaml
잘 만들어졌다면 실제 구성된 cluster에서 pod를 확인 해본다.
1
2
3
4
5
6
7
8
9
10
11
12
13
14
15
16
17
18
19
20
21
22
23
24
25
26
27
28
29
30
31
# pod 확인(구성 이후의 상태이므로 실제로 구축과는 다를 수 있음)
dor1@is-master:~/rook/deploy/examples$ kubectl -n rook-ceph get pod
NAME                                                   READY   STATUS      RESTARTS   AGE
csi-cephfsplugin-64p98                                 2/2     Running     0          25h
csi-cephfsplugin-d9gb2                                 2/2     Running     0          25h
csi-cephfsplugin-fg5f2                                 2/2     Running     0          25h
csi-cephfsplugin-provisioner-7c594f8cf-clfrz           5/5     Running     0          25h
csi-cephfsplugin-provisioner-7c594f8cf-gx2q7           5/5     Running     0          25h
csi-rbdplugin-74vqr                                    2/2     Running     0          25h
csi-rbdplugin-provisioner-99dd6c4c6-gpzs4              5/5     Running     0          25h
csi-rbdplugin-provisioner-99dd6c4c6-x2bs7              5/5     Running     0          25h
csi-rbdplugin-tmfmr                                    2/2     Running     0          25h
csi-rbdplugin-vnppv                                    2/2     Running     0          25h
rook-ceph-crashcollector-is-worker1-845b749546-jlx5c   1/1     Running     0          21h
rook-ceph-crashcollector-is-worker2-5dfd7b5f95-72hxn   1/1     Running     0          25h
rook-ceph-crashcollector-is-worker3-5c9446bd6d-92dn5   1/1     Running     0          21h
rook-ceph-mgr-a-644b9d9f4f-rlzs2                       3/3     Running     0          23h
rook-ceph-mgr-b-6cdf547fbd-qjnlh                       3/3     Running     0          23h
rook-ceph-mon-a-5c64dbb64f-258rt                       2/2     Running     0          25h
rook-ceph-mon-b-7fc6cd8568-tssnd                       2/2     Running     0          25h
rook-ceph-mon-c-66cc996cd6-svwxn                       2/2     Running     0          25h
rook-ceph-operator-cb99d8d4d-5hclf                     1/1     Running     0          40h
rook-ceph-osd-0-6485bcf87f-99nv6                       2/2     Running     0          25h
rook-ceph-osd-1-9656b7658-5gvss                        2/2     Running     0          25h
rook-ceph-osd-2-589764bf94-vnhds                       2/2     Running     0          25h
rook-ceph-osd-3-88b88977c-9kp7m                        2/2     Running     0          25h
rook-ceph-osd-4-86bcc48d5b-ttmzf                       2/2     Running     0          25h
rook-ceph-osd-5-755c7c5866-fnvrp                       2/2     Running     0          25h
rook-ceph-osd-prepare-is-worker1-ljdjs                 0/1     Completed   0          130m
rook-ceph-osd-prepare-is-worker2-75nxx                 0/1     Completed   0          130m
rook-ceph-osd-prepare-is-worker3-h4n89                 0/1     Completed   0          130m
구성
보통 ceph의 구성 중 가장 많이 사용되는 항목은 toolbox와 dashboard이다.
1. Deploy Toolbox
toolbox는 ceph의 mon의 endpoint와 연결되어 ceph command를 정상적으로 사용할 수 있게 한다.
deploy 자체는 간단하다.
https://rook.io/docs/rook/v1.10/Troubleshooting/ceph-toolbox/
1
2
3
4
5
6
7
8
9
10
11
12
13
14
15
16
17
18
19
20
21
22
23
24
25
26
27
28
29
# deploy toolbox
dor1@is-master:~/rook/deploy/examples$ kubectl create -f toolbox.yaml
deployment.apps/rook-ceph-tools created

# rollout toolbox(배포 확인)
dor1@is-master:~/rook/deploy/examples$ kubectl -n rook-ceph rollout status deploy/rook-ceph-tools
deployment "rook-ceph-tools" successfully rolled out

# ceph command를 통한 status 확인(구성 이후의 상태이므로 실제로 구축과는 다를 수 있음)
dor1@is-master:~/rook/deploy/example$ kubectl -n rook-ceph exec -it deploy/rook-ceph-tools -- ceph -s
  cluster:
    id:     371b65b0-9011-4b25-a50e-4ce989407b53
    health: HEALTH_OK

  services:
    mon: 3 daemons, quorum a,b,c (age 26h)
    mgr: b(active, since 24h), standbys: a
    mds: 1/1 daemons up, 1 hot standby
    osd: 6 osds: 6 up (since 26h), 6 in (since 26h)

  data:
    volumes: 1/1 healthy
    pools:   3 pools, 49 pgs
    objects: 27 objects, 1.4 MiB
    usage:   148 MiB used, 11 TiB / 11 TiB avail
    pgs:     49 active+clean

  io:
    client:   852 B/s rd, 1 op/s rd, 0 op/s wr
2. Deploy Ceph Dashboard
dashboard는 기본적으로 cluster.yaml이 정상적으로 배포 되어있으면 rook-ceph-mgr-dashboard항목이 올라가 있다.
하지만, 기본적으로 mgr은 ClusterIP으로 되어있고, mgr node의 연결이 끊어지면 다음 worker node로 변경이 되기 때문에 NodePort로 따로 구성을 해줘야 한다.
https://rook.io/docs/rook/v1.10/Storage-Configuration/Monitoring/ceph-dashboard/
1
2
3
4
5
6
7
8
9
10
11
12
13
14
15
16
17
18
19
20
21
22
23
24
25
26
# cluster.yaml에서 dashboard enable 확인
dor1@is-master:~/rook/deploy/examples$ cat cluster.yaml | grep -i dashboard -C 1
    modules:
      # Several modules should not need to be included in this list. The "dashboard" and "monitoring" modules
      # are already enabled by other settings in the cluster CR.
--
        enabled: true
  # enable the ceph dashboard for viewing cluster status
  # 확인
  dashboard:
    enabled: true
    # serve the dashboard under a subpath (useful when you are accessing the dashboard via a reverse proxy)
    # urlPrefix: /ceph-dashboard
    # serve the dashboard at the given port.
    port: 8443
    # serve the dashboard using SSL
    ssl: true

# mgr service 확인(구성 이후의 상태이므로 실제로 구축과는 다를 수 있음)
dor1@is-master:~/rook/deploy/examples$ kubectl get svc -n rook-ceph
NAME                                     TYPE        CLUSTER-IP      EXTERNAL-IP   PORT(S)             AGE
rook-ceph-mgr                            ClusterIP   10.233.30.175   <none>        9283/TCP            26h
rook-ceph-mgr-dashboard                  ClusterIP   10.233.39.173   <none>        8443/TCP            26h
rook-ceph-mon-a                          ClusterIP   10.233.19.158   <none>        6789/TCP,3300/TCP   26h
rook-ceph-mon-b                          ClusterIP   10.233.19.79    <none>        6789/TCP,3300/TCP   26h
rook-ceph-mon-c                          ClusterIP   10.233.59.236   <none>        6789/TCP,3300/TCP   26h
1
2
3
4
5
6
7
8
9
10
11
12
13
14
15
16
17
18
19
20
21
22
23
# NodePort로 변경
dor1@is-master:~/rook/deploy/examples$ vi dashboard-external-https.yaml
apiVersion: v1
kind: Service
metadata:
  name: rook-ceph-mgr-dashboard-external-https
  namespace: rook-ceph # namespace:cluster
  labels:
    app: rook-ceph-mgr
    rook_cluster: rook-ceph # namespace:cluster
spec:
  ports:
    - name: dashboard
      port: 8443
      protocol: TCP
      targetPort: 8443
      # 추가, k8s의 NodePort 범위(30000-32767) 중 임의적으로 설정
      nodePort: 30030
  selector:
    app: rook-ceph-mgr
    rook_cluster: rook-ceph
  sessionAffinity: None
  type: NodePort
1
2
3
4
5
6
7
8
9
10
11
12
13
# 적용
dor1@is-master:~/rook/deploy/examples$ kubectl create -f dashboard-external-https.yaml
service/rook-ceph-mgr-dashboard-external-https created

# 확인(구성 이후의 상태이므로 실제로 구축과는 다를 수 있음)
dor1@is-master:~/rook/deploy/examples$ kubectl get svc -n rook-ceph
NAME                                     TYPE        CLUSTER-IP      EXTERNAL-IP   PORT(S)             AGE
rook-ceph-mgr                            ClusterIP   10.233.30.175   <none>        9283/TCP            26h
rook-ceph-mgr-dashboard                  ClusterIP   10.233.39.173   <none>        8443/TCP            26h
rook-ceph-mgr-dashboard-external-https   NodePort    10.233.34.62    <none>        8443:30030/TCP      24h
rook-ceph-mon-a                          ClusterIP   10.233.19.158   <none>        6789/TCP,3300/TCP   26h
rook-ceph-mon-b                          ClusterIP   10.233.19.79    <none>        6789/TCP,3300/TCP   26h
rook-ceph-mon-c                          ClusterIP   10.233.59.236   <none>        6789/TCP,3300/TCP   26h
Deploy 시에 시간이 다소 걸릴 수 있으므로 인내심이 필요하다. Deploy가 다 되었다면 접속해서 확인 해본다.
 Ceph Dashaboard
기본적으로 계정은 admin으로 사용되며, 초기 비밀번호는 k8s의 secret에 등록되어 있어 kubectl을 통해 확인이 가능하다.
1
2
dor1@is-master:~/rook/deploy/examples$ kubectl -n rook-ceph get secret rook-ceph-dashboard-password -o jsonpath="{['data']['password']}" | base64 --decode && echo
RtS/E~>g`Z$Ma58WAb"O
CephFS 생성 후 테스트 해보기
1. CephFS 생성
 CephFS 구조
보통 Filesystem은 개요에서도 언급하였던 것과 같이 pod별로 모두 사용할 수 있는 CephFS(RWX)를 많이 사용한다.
rook-ceph에서는 CephFS를 생성하면 자동으로 mds를 구성해준다.
CephFS의 생성은 다음의 링크를 통해서도 확인이 가능하다.
https://rook.io/docs/rook/v1.10/Storage-Configuration/Shared-Filesystem-CephFS/filesystem-storage/#create-the-filesystem
1
2
3
4
5
6
7
8
9
10
11
12
13
14
15
16
17
18
19
20
21
22
23
24
25
26
27
28
29
30
31
32
33
34
35
36
37
38
39
40
41
42
43
44
45
46
47
48
49
50
51
52
53
54
55
56
57
58
59
60
61
62
63
64
65
66
67
68
69
70
71
72
73
74
75
76
77
78
79
80
81
82
83
84
85
86
87
88
89
90
91
92
93
94
95
96
97
98
99
100
101
102
103
104
105
106
107
108
109
110
111
112
113
114
115
116
117
118
119
120
121
122
123
124
125
126
127
128
129
130
131
132
133
134
# CephFS deploy(filesystem.yaml)
dor1@is-master:~/rook/deploy/examples$ filesystem.yaml
#################################################################################################################
# Create a filesystem with settings with replication enabled for a production environment.
# A minimum of 3 OSDs on different nodes are required in this example.
#  kubectl create -f filesystem.yaml
#################################################################################################################

apiVersion: ceph.rook.io/v1
kind: CephFilesystem
metadata:
  # name 변경
  name: cephfs
  namespace: rook-ceph # namespace:cluster
spec:
  # The metadata pool spec. Must use replication.
  metadataPool:
    replicated:
      size: 3
      requireSafeReplicaSize: true
    parameters:
      # Inline compression mode for the data pool
      # Further reference: https://docs.ceph.com/docs/master/rados/configuration/bluestore-config-ref/#inline-compression
      compression_mode:
        none
        # gives a hint (%) to Ceph in terms of expected consumption of the total cluster capacity of a given pool
      # for more info: https://docs.ceph.com/docs/master/rados/operations/placement-groups/#specifying-expected-pool-size
      #target_size_ratio: ".5"
  # The list of data pool specs. Can use replication or erasure coding.
  dataPools:
    - name: replicated
      failureDomain: host
      replicated:
        size: 3
        # Disallow setting pool with replica 1, this could lead to data loss without recovery.
        # Make sure you're *ABSOLUTELY CERTAIN* that is what you want
        requireSafeReplicaSize: true
      parameters:
        # Inline compression mode for the data pool
        # Further reference: https://docs.ceph.com/docs/master/rados/configuration/bluestore-config-ref/#inline-compression
        compression_mode:
          none
          # gives a hint (%) to Ceph in terms of expected consumption of the total cluster capacity of a given pool
        # for more info: https://docs.ceph.com/docs/master/rados/operations/placement-groups/#specifying-expected-pool-size
        #target_size_ratio: ".5"
  # Whether to preserve filesystem after CephFilesystem CRD deletion
  preserveFilesystemOnDelete: true
  # The metadata service (mds) configuration
  metadataServer:
    # The number of active MDS instances
    activeCount: 1
    # Whether each active MDS instance will have an active standby with a warm metadata cache for faster failover.
    # If false, standbys will be available, but will not have a warm cache.
    activeStandby: true
    # The affinity rules to apply to the mds deployment
    placement:
      #  nodeAffinity:
      #    requiredDuringSchedulingIgnoredDuringExecution:
      #      nodeSelectorTerms:
      #      - matchExpressions:
      #        - key: role
      #          operator: In
      #          values:
      #          - mds-node
      #  topologySpreadConstraints:
      #  tolerations:
      #  - key: mds-node
      #    operator: Exists
      #  podAffinity:
      podAntiAffinity:
        requiredDuringSchedulingIgnoredDuringExecution:
          - labelSelector:
              matchExpressions:
                - key: app
                  operator: In
                  values:
                    - rook-ceph-mds
            # topologyKey: kubernetes.io/hostname will place MDS across different hosts
            topologyKey: kubernetes.io/hostname
        preferredDuringSchedulingIgnoredDuringExecution:
          - weight: 100
            podAffinityTerm:
              labelSelector:
                matchExpressions:
                  - key: app
                    operator: In
                    values:
                      - rook-ceph-mds
              # topologyKey: */zone can be used to spread MDS across different AZ
              # Use <topologyKey: failure-domain.beta.kubernetes.io/zone> in k8s cluster if your cluster is v1.16 or lower
              # Use <topologyKey: topology.kubernetes.io/zone>  in k8s cluster is v1.17 or upper
              topologyKey: topology.kubernetes.io/zone
    # A key/value list of annotations
    # annotations:
    #  key: value
    # A key/value list of labels
    # labels:
    #  key: value
    # resources:
    # The requests and limits set here, allow the filesystem MDS Pod(s) to use half of one CPU core and 1 gigabyte of memory
    #  limits:
    #    cpu: "500m"
    #    memory: "1024Mi"
    #  requests:
    #    cpu: "500m"
    #    memory: "1024Mi"
    priorityClassName: system-cluster-critical
    livenessProbe:
      disabled: false
    startupProbe:
      disabled: false
  # Filesystem mirroring settings
  # mirroring:
    # enabled: true
    # list of Kubernetes Secrets containing the peer token
    # for more details see: https://docs.ceph.com/en/latest/dev/cephfs-mirroring/#bootstrap-peers
    # Add the secret name if it already exists else specify the empty list here.
    # peers:
      #secretNames:
        #- secondary-cluster-peer
    # specify the schedule(s) on which snapshots should be taken
    # see the official syntax here https://docs.ceph.com/en/latest/cephfs/snap-schedule/#add-and-remove-schedules
    # snapshotSchedules:
    #   - path: /
    #     interval: 24h # daily snapshots
        # The startTime should be mentioned in the format YYYY-MM-DDTHH:MM:SS
        # If startTime is not specified, then by default the start time is considered as midnight UTC.
        # see usage here https://docs.ceph.com/en/latest/cephfs/snap-schedule/#usage
        # startTime: 2022-07-15T11:55:00
    # manage retention policies
    # see syntax duration here https://docs.ceph.com/en/latest/cephfs/snap-schedule/#add-and-remove-retention-policies
    # snapshotRetention:
    #   - path: /
    #     duration: "h 24"
1
2
3
4
5
6
7
8
9
10
11
12
13
14
15
16
17
18
19
20
21
22
23
24
25
26
27
28
29
30
31
32
33
34
35
36
37
38
39
# 적용
dor1@is-master:~/rook/deploy/examples$ kubectl create -f filesystem.yaml
cephfilesystem.ceph.rook.io/cephfs created

# CephFS 생성으로 인한 mds 확인(구성 이후의 상태이므로 실제로 구축과는 다를 수 있음)
dor1@is-master:~/rook/deploy/examples$ kubectl get pod -n rook-ceph
NAME                                                   READY   STATUS      RESTARTS   AGE
csi-cephfsplugin-64p98                                 2/2     Running     0          30h
csi-cephfsplugin-d9gb2                                 2/2     Running     0          30h
csi-cephfsplugin-fg5f2                                 2/2     Running     0          30h
csi-cephfsplugin-provisioner-7c594f8cf-clfrz           5/5     Running     0          30h
csi-cephfsplugin-provisioner-7c594f8cf-gx2q7           5/5     Running     0          30h
csi-rbdplugin-74vqr                                    2/2     Running     0          30h
csi-rbdplugin-provisioner-99dd6c4c6-gpzs4              5/5     Running     0          30h
csi-rbdplugin-provisioner-99dd6c4c6-x2bs7              5/5     Running     0          30h
csi-rbdplugin-tmfmr                                    2/2     Running     0          30h
csi-rbdplugin-vnppv                                    2/2     Running     0          30h
rook-ceph-crashcollector-is-worker1-845b749546-wv5wv   1/1     Running     0          56s
rook-ceph-crashcollector-is-worker2-5dfd7b5f95-72hxn   1/1     Running     0          30h
rook-ceph-crashcollector-is-worker3-5c9446bd6d-8d55k   1/1     Running     0          49s
# mds
rook-ceph-mds-cephfs-a-6df48cbdb8-ngrsg                2/2     Running     0          56s
rook-ceph-mds-cephfs-b-c67d6677c-vlvln                 2/2     Running     0          50s
rook-ceph-mgr-a-644b9d9f4f-rlzs2                       3/3     Running     0          28h
rook-ceph-mgr-b-6cdf547fbd-qjnlh                       3/3     Running     0          28h
rook-ceph-mon-a-5c64dbb64f-258rt                       2/2     Running     0          30h
rook-ceph-mon-b-7fc6cd8568-tssnd                       2/2     Running     0          30h
rook-ceph-mon-c-66cc996cd6-svwxn                       2/2     Running     0          30h
rook-ceph-operator-cb99d8d4d-5hclf                     1/1     Running     0          45h
rook-ceph-osd-0-6485bcf87f-99nv6                       2/2     Running     0          30h
rook-ceph-osd-1-9656b7658-5gvss                        2/2     Running     0          30h
rook-ceph-osd-2-589764bf94-vnhds                       2/2     Running     0          30h
rook-ceph-osd-3-88b88977c-9kp7m                        2/2     Running     0          30h
rook-ceph-osd-4-86bcc48d5b-ttmzf                       2/2     Running     0          30h
rook-ceph-osd-5-755c7c5866-fnvrp                       2/2     Running     0          30h
rook-ceph-osd-prepare-is-worker1-ljdjs                 0/1     Completed   0          6h49m
rook-ceph-osd-prepare-is-worker2-75nxx                 0/1     Completed   0          6h49m
rook-ceph-osd-prepare-is-worker3-h4n89                 0/1     Completed   0          6h49m
rook-ceph-tools-7857bc9568-262sx                       1/1     Running     0          4h8m
정상적으로 pod가 올라왔다면 ceph의 status도 확인 해보면 된다.
1
2
3
4
5
6
7
8
9
10
11
12
13
14
15
16
17
18
19
20
21
# ceph command를 통한 status 확인(구성 이후의 상태이므로 실제로 구축과는 다를 수 있음)
dor1@is-master:~/rook/deploy/examples$ kubectl exec -n rook-ceph -it deploy/rook-ceph-tools -- ceph -s
  cluster:
    id:     371b65b0-9011-4b25-a50e-4ce989407b53
    health: HEALTH_OK

  services:
    mon: 3 daemons, quorum a,b,c (age 30h)
    mgr: b(active, since 28h), standbys: a
    mds: 1/1 daemons up, 1 hot standby
    osd: 6 osds: 6 up (since 30h), 6 in (since 30h)

  data:
    volumes: 1/1 healthy
    pools:   3 pools, 49 pgs
    objects: 26 objects, 1.4 MiB
    usage:   152 MiB used, 11 TiB / 11 TiB avail
    pgs:     49 active+clean

  io:
    client:   852 B/s rd, 1 op/s rd, 0 op/s wr
2. StorageClass 생성
기본적으로 CephFS는 생성 후 StorageClass가 있어야 POD에서 생성이 가능하다.
https://rook.io/docs/rook/v1.10/Storage-Configuration/Shared-Filesystem-CephFS/filesystem-storage/#provision-storage
1
2
3
4
5
6
7
8
9
10
11
12
13
14
15
16
17
18
19
20
21
22
23
24
25
26
27
28
29
30
31
32
33
34
35
36
37
38
39
40
41
42
43
dor1@is-master:~/rook/deploy/examples$ cd csi/cephfs
# storageclass.yaml
dor1@is-master:~/rook/deploy/examples/csi/cephfs$ vi storageclass.yaml
apiVersion: storage.k8s.io/v1
kind: StorageClass
metadata:
  name: rook-cephfs
# Change "rook-ceph" provisioner prefix to match the operator namespace if needed
provisioner: rook-ceph.cephfs.csi.ceph.com # driver:namespace:operator
parameters:
  # clusterID is the namespace where the rook cluster is running
  # If you change this namespace, also change the namespace below where the secret namespaces are defined
  clusterID: rook-ceph # namespace:cluster

  # CephFS filesystem name into which the volume shall be created
  # FS 이름 변경
  fsName: cephfs

  # Ceph pool into which the volume shall be created
  # Required for provisionVolume: "true"
  # pool의 이름에 FS 이름을 넣어 변경
  pool: cephfs-replicated

  # The secrets contain Ceph admin credentials. These are generated automatically by the operator
  # in the same namespace as the cluster.
  csi.storage.k8s.io/provisioner-secret-name: rook-csi-cephfs-provisioner
  csi.storage.k8s.io/provisioner-secret-namespace: rook-ceph # namespace:cluster
  csi.storage.k8s.io/controller-expand-secret-name: rook-csi-cephfs-provisioner
  csi.storage.k8s.io/controller-expand-secret-namespace: rook-ceph # namespace:cluster
  csi.storage.k8s.io/node-stage-secret-name: rook-csi-cephfs-node
  csi.storage.k8s.io/node-stage-secret-namespace: rook-ceph # namespace:cluster

  # (optional) The driver can use either ceph-fuse (fuse) or ceph kernel client (kernel)
  # If omitted, default volume mounter will be used - this is determined by probing for ceph-fuse
  # or by setting the default mounter explicitly via --volumemounter command-line argument.
  # mounter: kernel
# 변경 Delete -> Retain
reclaimPolicy: Retain
# 추가부분
allowVolumeExpansion: true
#mountOptions:
  # uncomment the following line for debugging
  #- debug
1
2
3
4
5
6
7
8
# 적용
dor1@is-master:~/rook/deploy/examples/csi/cephfs$ kubectl create -f storageclass.yaml
storageclass.storage.k8s.io/rook-cephfs created

# 확인
dor1@is-master:~/rook/deploy/examples/csi/cephfs$ kubectl get storageclass
NAME          PROVISIONER                     RECLAIMPOLICY   VOLUMEBINDINGMODE   ALLOWVOLUMEEXPANSION   AGE
rook-cephfs   rook-ceph.cephfs.csi.ceph.com   Delete          Immediate           true                   29s
이렇게 되면 세팅은 다 끝이 났다.
이제 PersistentVolumeClaim을 만들어 볼륨을 사용하기만 하면 된다.
3. Volume 테스트
kube-registry.yaml을 통해 registry와 PVC를 같이 deploy 하여 volume이 mount 되는지 확인 해본다.
1
2
3
4
5
6
7
8
9
10
11
12
13
14
15
16
17
18
19
20
21
22
23
24
25
26
27
28
29
30
31
32
33
34
35
36
37
38
39
40
41
42
43
44
45
46
47
48
49
50
51
52
53
54
55
56
57
58
59
60
61
62
63
64
65
66
67
68
69
70
71
# kube-registry.yaml
dor1@is-master:~/rook/deploy/examples/csi/cephfs$ vi kube-registry.yaml
apiVersion: v1
kind: PersistentVolumeClaim
metadata:
  name: cephfs-pvc
  namespace: kube-system
spec:
  accessModes:
    - ReadWriteMany
  resources:
    requests:
      # 용량 1Gi -> 10Gi 수정
      storage: 10Gi
  storageClassName: rook-cephfs
---
apiVersion: apps/v1
kind: Deployment
metadata:
  name: kube-registry
  namespace: kube-system
  labels:
    k8s-app: kube-registry
    kubernetes.io/cluster-service: "true"
spec:
  replicas: 3
  selector:
    matchLabels:
      k8s-app: kube-registry
  template:
    metadata:
      labels:
        k8s-app: kube-registry
        kubernetes.io/cluster-service: "true"
    spec:
      containers:
        - name: registry
          image: registry:2
          imagePullPolicy: Always
          resources:
            limits:
              cpu: 100m
              memory: 100Mi
          env:
            # Configuration reference: https://docs.docker.com/registry/configuration/
            - name: REGISTRY_HTTP_ADDR
              value: :5000
            - name: REGISTRY_HTTP_SECRET
              value: "Ple4seCh4ngeThisN0tAVerySecretV4lue"
            - name: REGISTRY_STORAGE_FILESYSTEM_ROOTDIRECTORY
              value: /var/lib/registry
          volumeMounts:
            - name: image-store
              mountPath: /var/lib/registry
          ports:
            - containerPort: 5000
              name: registry
              protocol: TCP
          livenessProbe:
            httpGet:
              path: /
              port: registry
          readinessProbe:
            httpGet:
              path: /
              port: registry
      volumes:
        - name: image-store
          persistentVolumeClaim:
            claimName: cephfs-pvc
            readOnly: false
1
2
3
4
5
6
7
8
9
10
11
12
13
14
15
16
17
18
19
20
21
22
23
24
25
26
27
28
29
30
31
32
33
34
35
36
37
38
39
40
41
42
43
44
45
46
47
48
49
50
51
52
# 적용
dor1@is-master:~/rook/deploy/examples/csi/cephfs$ kubectl create -f deploy/examples/csi/cephfs/kube-registry.yaml
persistentvolumeclaim/cephfs-pvc created
deployment.apps/kube-registry created

# pod 확인
dor1@is-master:~/rook/deploy/examples/csi/cephfs$ kubectl get po -n kube-system
NAME                                       READY   STATUS    RESTARTS      AGE
calico-kube-controllers-5cc4cdb7ff-6gxcd   1/1     Running   1 (45h ago)   46h
calico-node-5hpn9                          1/1     Running   1 (45h ago)   46h
calico-node-5lw2h                          1/1     Running   1 (45h ago)   46h
calico-node-9zbqq                          1/1     Running   1 (45h ago)   46h
calico-node-z5h6f                          1/1     Running   0             46h
coredns-fb4b8cf5c-h9v9b                    1/1     Running   1 (45h ago)   46h
coredns-fb4b8cf5c-z82df                    1/1     Running   1 (45h ago)   46h
haproxy-is-worker1                         1/1     Running   1 (45h ago)   46h
haproxy-is-worker2                         1/1     Running   1 (45h ago)   46h
haproxy-is-worker3                         1/1     Running   1 (45h ago)   46h
kube-apiserver-is-master                   1/1     Running   0             46h
kube-controller-manager-is-master          1/1     Running   0             46h
kube-proxy-88qtb                           1/1     Running   1 (45h ago)   46h
kube-proxy-d26gs                           1/1     Running   0             46h
kube-proxy-fw6bz                           1/1     Running   1 (45h ago)   46h
kube-proxy-sbwt7                           1/1     Running   1 (45h ago)   46h
kube-registry-74d7b9999c-cp5nm             1/1     Running   0             34s
kube-registry-74d7b9999c-fpcnc             1/1     Running   0             34s
kube-registry-74d7b9999c-l8p26             1/1     Running   0             34s
kube-scheduler-is-master                   1/1     Running   0             46h
nodelocaldns-7xv6n                         1/1     Running   0             46h
nodelocaldns-92tgl                         1/1     Running   1 (45h ago)   46h
nodelocaldns-9np94                         1/1     Running   1 (45h ago)   46h
nodelocaldns-hlf87                         1/1     Running   1 (45h ago)   46h

# pod 내 volume 확인
dor1@is-master:~/rook/deploy/examples/csi/cephfs$ kubectl exec -it -n kube-system kube-registry-74d7b9999c-cp5nm -- df -h
Filesystem                Size      Used Available Use% Mounted on
overlay                 223.1G     17.3G    204.1G   8% /
tmpfs                    64.0M         0     64.0M   0% /dev
shm                      64.0M         0     64.0M   0% /dev/shm
/dev/sda2               223.1G     17.3G    204.1G   8% /etc/hosts
/dev/sda2               223.1G     17.3G    204.1G   8% /dev/termination-log
/dev/sda2               223.1G     17.3G    204.1G   8% /etc/hostname
/dev/sda2               223.1G     17.3G    204.1G   8% /etc/resolv.conf
10.233.19.79:6789,10.233.59.236:6789,10.233.19.158:6789:/volumes/csi/csi-vol-beedb384-a2c7-11ed-a9ab-8e5fb48ecb47/7ee865b4-4ec3-4d12-8c16-8462de400184
                         10.0G         0     10.0G   0% /var/lib/registry
tmpfs                   100.0M     12.0K    100.0M   0% /run/secrets/kubernetes.io/serviceaccount
tmpfs                    47.1G         0     47.1G   0% /proc/acpi
tmpfs                    64.0M         0     64.0M   0% /proc/kcore
tmpfs                    64.0M         0     64.0M   0% /proc/keys
tmpfs                    64.0M         0     64.0M   0% /proc/timer_list
tmpfs                    47.1G         0     47.1G   0% /proc/scsi
tmpfs                    47.1G         0     47.1G   0% /sys/firmware
Troubleshooting
버전 업데이트 되면서 이미 해결되어 있을 수 있음
1. 재구성 시 mgr 및 osd가 안 올라오는 현상
cluster.yaml의 dataDirHostPath항목이 변경이 안되어있는 상태에서, rook-ceph을 재구성 한다 하면 kubectl create -f cluster.yaml으로 deploy 해도 mgr, osd가 안 올라오는 경우가 있다.
이럴 때는 보통 dataDirHostPath에서 지정된 directory에 mgr, osd와 같은 daemon 파일들이 남아있어, worker 모든 node에서 dataDirHostPath의 들어 가있는 directory를 제거 해 준 뒤, kubectl create -f cluster.yaml을 통하여 deploy 하면 정상적으로 올라오는 것을 확인할 수 있다.
1
2
3
4
5
6
7
8
9
10
11
12
13
14
15
16
17
18
19
20
# master에서 ceph cluster 제거
dor1@is-master:~/rook/deploy/examples$ kubectl delete -f cluster.yaml

# cluster.yaml의 dataDirHostPath 확인
dor1@is-worker1:~$ cat cluster.yaml  | grep -i datadirhostpath
  dataDirHostPath: /var/lib/rook

# 모든 worker node에서 dataDirHostPath의 경로 확인
dor1@is-worker1:~$ ll /var/lib/rook/
total 0
drwxr-xr-x 1 root root  28 Feb  1 09:30 ./
drwxr-xr-x 1 root root 730 Feb  1 09:30 ../
drwxr-xr-x 1 root root   8 Feb  1 09:30 mon-a/
drwxr-xr-x 1 root root 380 Feb  1 09:33 rook-ceph/

# 삭제
dor1@is-worker1:~$ sudo rm -rf /var/lib/rook/*

# master에서 다시 ceph cluster 생성
dor1@is-master:~/rook/deploy/examples$ kubectl create -f cluster.yaml