Ubuntu - LDAP Server 구축
Ubuntu에서 계정과 보안 설정을 하는 LDAP Server를 구축하는 방법이다.
Ubuntu 22.04 LTS
Host
CLI
개요
- LDAP(Lightweight Directory Access Protocol)의 server의 세팅 방법을 제공한다.
- Client 설정은 다음과 같은 link로 가면 된다.
Linux(Ubuntu) - LDAP client 설정
ref.
설치 및 세팅
slapd(the Stand-alone LDAP Daemon) 패키지를 설치하면 된다.
Ubuntu official server docs에 나와있으니 참조하여서 진행하면 된다.
https://ubuntu.com/server/docs/install-and-configure-ldap
1
2
3
4
5
6
7
8
9
10
11
12
13
14
15
16
17
18
19
20
21
22
23
24
25
26
27
28
29
30
31
32
33
34
35
36
37
38
39
40
41
42
43
44
45
46
47
48
49
50
51
52
53
54
55
56
57
58
59
60
61
62
63
64
admin@ldap-server-test2:~$ sudo apt install slapd ldap-utils
Reading package lists... Done
Building dependency tree... Done
Reading state information... Done
The following additional packages will be installed:
  libldap-2.5-0 libltdl7 libodbc2
Suggested packages:
  libsasl2-modules-gssapi-mit | libsasl2-modules-gssapi-heimdal odbc-postgresql tdsodbc
The following NEW packages will be installed:
  ldap-utils libltdl7 libodbc2 slapd
The following packages will be upgraded:
  libldap-2.5-0
1 upgraded, 4 newly installed, 0 to remove and 37 not upgraded.
Need to get 2,066 kB of archives.
After this operation, 6,474 kB of additional disk space will be used.
Do you want to continue? [Y/n]
Get:1 http://mirror.kakao.com/ubuntu jammy-updates/main amd64 libldap-2.5-0 amd64 2.5.17+dfsg-0ubuntu0.22.04.1 [183 kB]
Get:2 http://mirror.kakao.com/ubuntu jammy/main amd64 libltdl7 amd64 2.4.6-15build2 [39.6 kB]
Get:3 http://mirror.kakao.com/ubuntu jammy-security/main amd64 libodbc2 amd64 2.3.9-5ubuntu0.1 [159 kB]
Get:4 http://mirror.kakao.com/ubuntu jammy-updates/main amd64 slapd amd64 2.5.17+dfsg-0ubuntu0.22.04.1 [1,537 kB]
Get:5 http://mirror.kakao.com/ubuntu jammy-updates/main amd64 ldap-utils amd64 2.5.17+dfsg-0ubuntu0.22.04.1 [147 kB]
Fetched 2,066 kB in 0s (6,582 kB/s)
Preconfiguring packages ...
(Reading database ... 80623 files and directories currently installed.)
Preparing to unpack .../libldap-2.5-0_2.5.17+dfsg-0ubuntu0.22.04.1_amd64.deb ...
Unpacking libldap-2.5-0:amd64 (2.5.17+dfsg-0ubuntu0.22.04.1) over (2.5.16+dfsg-0ubuntu0.22.04.2) ...
Selecting previously unselected package libltdl7:amd64.
Preparing to unpack .../libltdl7_2.4.6-15build2_amd64.deb ...
Unpacking libltdl7:amd64 (2.4.6-15build2) ...
Selecting previously unselected package libodbc2:amd64.
Preparing to unpack .../libodbc2_2.3.9-5ubuntu0.1_amd64.deb ...
Unpacking libodbc2:amd64 (2.3.9-5ubuntu0.1) ...
Selecting previously unselected package slapd.
Preparing to unpack .../slapd_2.5.17+dfsg-0ubuntu0.22.04.1_amd64.deb ...
Unpacking slapd (2.5.17+dfsg-0ubuntu0.22.04.1) ...
Selecting previously unselected package ldap-utils.
Preparing to unpack .../ldap-utils_2.5.17+dfsg-0ubuntu0.22.04.1_amd64.deb ...
Unpacking ldap-utils (2.5.17+dfsg-0ubuntu0.22.04.1) ...
Setting up libldap-2.5-0:amd64 (2.5.17+dfsg-0ubuntu0.22.04.1) ...
Setting up libltdl7:amd64 (2.4.6-15build2) ...
Setting up libodbc2:amd64 (2.3.9-5ubuntu0.1) ...
Setting up slapd (2.5.17+dfsg-0ubuntu0.22.04.1) ...
  Creating new user openldap... done.
  Creating initial configuration... done.
  Creating LDAP directory... done.
Setting up ldap-utils (2.5.17+dfsg-0ubuntu0.22.04.1) ...
Processing triggers for libc-bin (2.35-0ubuntu3.7) ...
Processing triggers for ufw (0.36.1-4ubuntu0.1) ...
Processing triggers for man-db (2.10.2-1) ...
Scanning processes...
Scanning candidates...
Scanning linux images...

Running kernel seems to be up-to-date.

Restarting services...
Service restarts being deferred:
 systemctl restart packagekit.service

No containers need to be restarted.

No user sessions are running outdated binaries.

No VM guests are running outdated hypervisor (qemu) binaries on this host
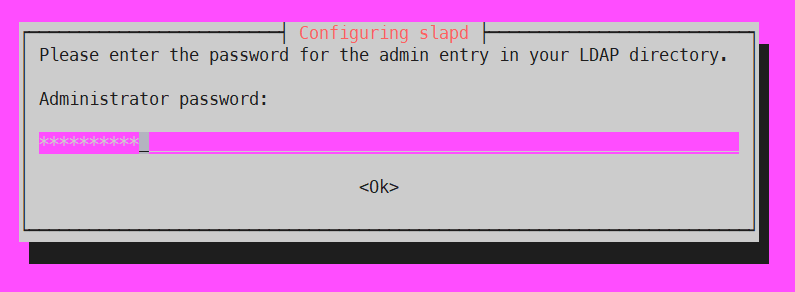
설치 중간에 admin계정에 대한 password를 입력하는 prompt가 나온다.
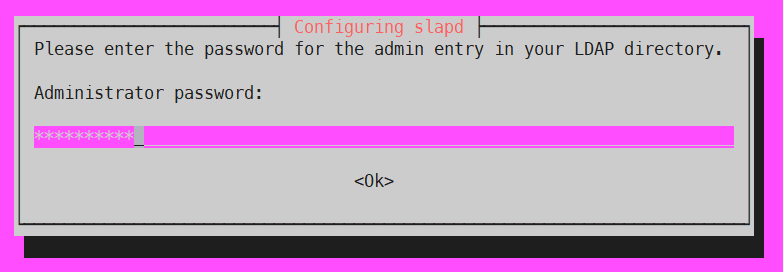 Admin password 입력
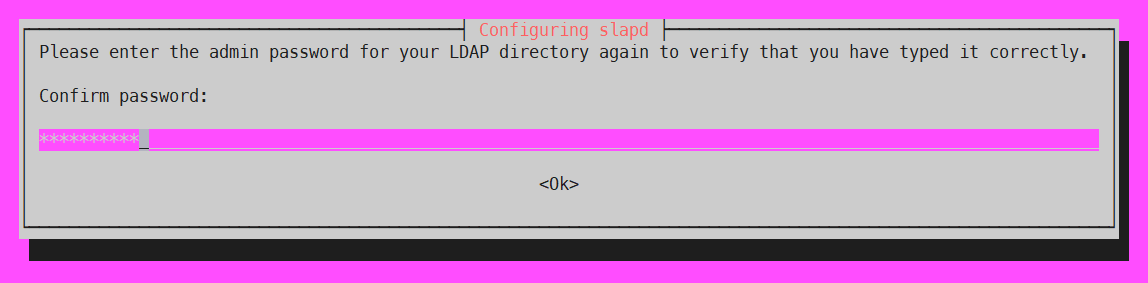
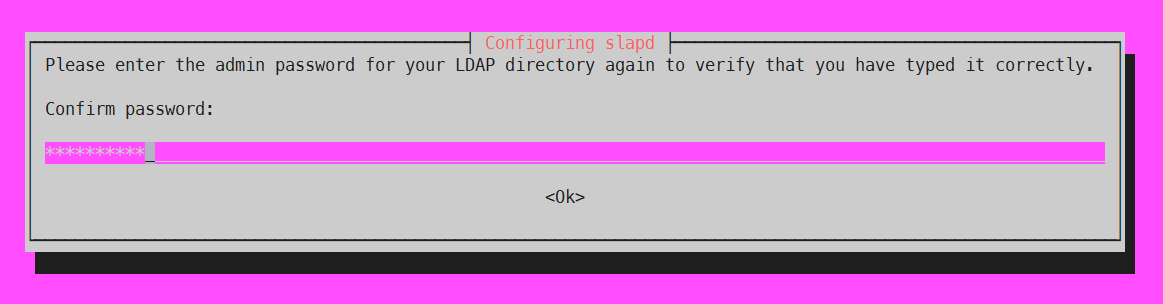 Admin password 확인
만약 adminpassword에 대해 잘못 입력했다면 다음과 같은 명령어로 변경은 가능하다.
1
2
3
4
5
admin@ldap-server-test2:~$ slappasswd

New password:
Re-enter new password:
{SSHA}VKrYMxlSKhONGRpC6rnASKNmXG2xHXFo
설치가 완료 되었다면, prompt를 통해 slapd의 세팅을 마무리 해주면 된다.
다음과 같이 입력하여 진행한다.
1
sudo dpkg-reconfigure slapd
prompt는 순차적으로 진행한다.
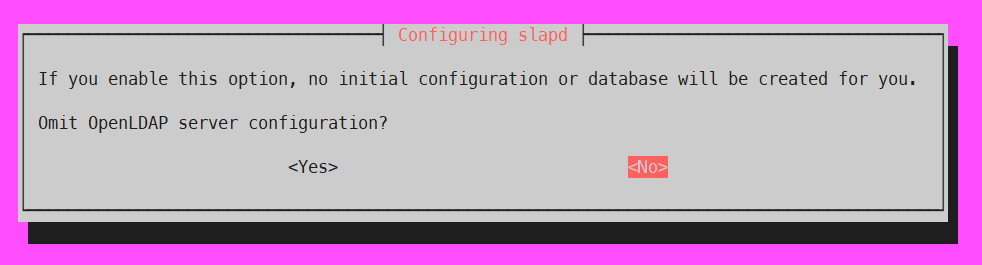 1. 기존 DB의 OpenLDAP server configuration에 대해 생략할지 선택
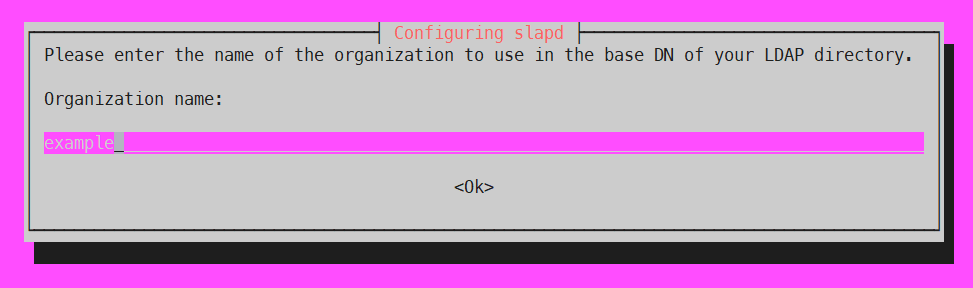
 2. base DN 설정 (example.com을 입력하면 향후 conf에서는 dc=example, dc=com으로 나타남)
 3. Organization name 설정
 4. Admin password 입력(위에서 생성한 password를 입력함)
 5. Admin password 확인
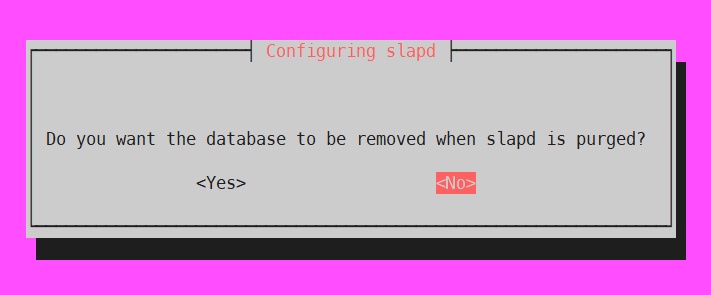 6. apt purge 시 slapd의 DB purged의 여부 확인
 7. 새로운 DB 생성 시 오래된 DB에 대해 이전 확인
slapd의 config값의 대한 수정 할 수 있는 항목들은 /etc/ldap/slapd.d이하에 cn=config.ldif에서 확인 할 수 있으며, 이 값은 보안상 동적으로 변경 되기에 변경할 수 없다.
cn=config.ldif는 ldapsearch의 명령어를 통해서도 확인이 가능하다.
1
2
3
4
5
6
7
8
9
10
11
12
13
14
15
16
17
18
19
20
admin@ldap-server-test2:~$ sudo ldapsearch -Q -LLL -Y EXTERNAL -H ldapi:/// -b cn=config dn
dn: cn=config

dn: cn=module{0},cn=config

dn: cn=schema,cn=config

dn: cn={0}core,cn=schema,cn=config

dn: cn={1}cosine,cn=schema,cn=config

dn: cn={2}nis,cn=schema,cn=config

dn: cn={3}inetorgperson,cn=schema,cn=config

dn: olcDatabase={-1}frontend,cn=config

dn: olcDatabase={0}config,cn=config

dn: olcDatabase={1}mdb,cn=config
추후 서버에서 관리 시 ldapsearch 등과 같은 명령어에 대해서 주소를 일일이 치기에 너무 명령어가 길어 지다보니 /etc/ldap/ldap.conf의 세팅을 변경하여서 기본적으로 세팅된 주소를 바라볼 수 있게끔 바꿔준다.
1
2
3
4
5
6
7
8
9
10
11
12
13
14
15
16
17
18
admin@ldap-server-test2: vi /etc/ldap/ldap.conf
#
# LDAP Defaults
#

# See ldap.conf(5) for details
# This file should be world readable but not world writable.

## 맞춰서 변경
BASE    dc=example,dc=com
URI     ldap://example.com

#SIZELIMIT      12
#TIMELIMIT      15
#DEREF          never

# TLS certificates (needed for GnuTLS)
TLS_CACERT      /etc/ssl/certs/ca-certificates.crt
여기까지면 LDAP server에 대한 기본 세팅 및 설치는 끝났다.
TLS/SSL 세팅 하기
일반적으로 TLS/SSL을 사용하면 보안이 좋아진다.
LDAP을 내부 NAT 망에서 사용한다면 굳이 필요는 없겠지만. LDAP client를 sssd와 같이 TLS/SSL이 꼭 필요한 곳에서 사용한다 했을 때는 세팅을 꼭 해야한다.
https://ubuntu.com/server/docs/ldap-and-transport-layer-security-tls
1. CA(Certificate Authority) 인증서 생성
인증서 생성하기 위한 패키지를 먼저 설치 한다.
1
2
3
4
5
6
7
8
9
10
11
12
13
14
15
16
17
18
19
20
21
22
23
24
25
26
27
28
29
30
31
32
33
34
35
36
37
38
39
40
41
42
43
44
admin@ldap-server-test2:~$ sudo apt install gnutls-bin ssl-cert
Reading package lists... Done
Building dependency tree... Done
Reading state information... Done
The following additional packages will be installed:
  libevent-2.1-7 libgnutls-dane0 libunbound8
Suggested packages:
  dns-root-data
The following NEW packages will be installed:
  gnutls-bin libevent-2.1-7 libgnutls-dane0 libunbound8 ssl-cert
0 upgraded, 5 newly installed, 0 to remove and 29 not upgraded.
Need to get 845 kB of archives.
After this operation, 2617 kB of additional disk space will be used.
Do you want to continue? [Y/n]
Get:1 http://mirror.kakao.com/ubuntu jammy/main amd64 libevent-2.1-7 amd64 2.1.12-stable-1build3 [148 kB]
Get:2 http://mirror.kakao.com/ubuntu jammy-security/main amd64 libunbound8 amd64 1.13.1-1ubuntu5.5 [399 kB]
Get:3 http://mirror.kakao.com/ubuntu jammy-security/main amd64 libgnutls-dane0 amd64 3.7.3-4ubuntu1.5 [22.6 kB]
Get:4 http://mirror.kakao.com/ubuntu jammy-security/universe amd64 gnutls-bin amd64 3.7.3-4ubuntu1.5 [257 kB]
Get:5 http://mirror.kakao.com/ubuntu jammy/main amd64 ssl-cert all 1.1.2 [17.4 kB]
Fetched 845 kB in 0s (11.2 MB/s)
Preconfiguring packages ...
Selecting previously unselected package libevent-2.1-7:amd64.
(Reading database ... 58221 files and directories currently installed.)
Preparing to unpack .../libevent-2.1-7_2.1.12-stable-1build3_amd64.deb ...
Unpacking libevent-2.1-7:amd64 (2.1.12-stable-1build3) ...
Selecting previously unselected package libunbound8:amd64.
Preparing to unpack .../libunbound8_1.13.1-1ubuntu5.5_amd64.deb ...
Unpacking libunbound8:amd64 (1.13.1-1ubuntu5.5) ...
Selecting previously unselected package libgnutls-dane0:amd64.
Preparing to unpack .../libgnutls-dane0_3.7.3-4ubuntu1.5_amd64.deb ...
Unpacking libgnutls-dane0:amd64 (3.7.3-4ubuntu1.5) ...
Selecting previously unselected package gnutls-bin.
Preparing to unpack .../gnutls-bin_3.7.3-4ubuntu1.5_amd64.deb ...
Unpacking gnutls-bin (3.7.3-4ubuntu1.5) ...
Selecting previously unselected package ssl-cert.
Preparing to unpack .../ssl-cert_1.1.2_all.deb ...
Unpacking ssl-cert (1.1.2) ...
Setting up ssl-cert (1.1.2) ...
Setting up libevent-2.1-7:amd64 (2.1.12-stable-1build3) ...
Setting up libunbound8:amd64 (1.13.1-1ubuntu5.5) ...
Setting up libgnutls-dane0:amd64 (3.7.3-4ubuntu1.5) ...
Setting up gnutls-bin (3.7.3-4ubuntu1.5) ...
Processing triggers for man-db (2.10.2-1) ...
Processing triggers for libc-bin (2.35-0ubuntu3.8) ..
CA 파일을 생성하기 위하여 설치 후 certtool로 pem key를 생성한다.
1
2
3
admin@ldap-server-test2:~$ sudo certtool --generate-privkey --bits 4096 --outfile /etc/ssl/private/example_com-ca.pem
** Note: You may use '--sec-param High' instead of '--bits 4096'
Generating a 4096 bit RSA private key..
info 파일을 따로 생성하여 정보를 넣는다.
1
2
3
4
5
6
# 10년 만기
admin@ldap-server-test2:~$ sudo vi /etc/ssl/example_com-ca.info
cn = example.com
ca
cert_signing_key
expiration_days = 3650
CA 파일 생성을 하기 위해 다음과 같이 진행한다.
1
2
3
4
5
6
7
8
9
10
11
12
13
14
15
16
17
18
19
20
21
22
23
24
25
26
27
28
29
30
31
32
33
34
35
36
37
38
39
40
41
42
43
44
45
46
47
48
49
50
51
52
53
54
55
56
57
58
59
60
61
62
63
64
65
66
67
68
# output의 위치는 기본 보관 위치인 /usr/local/share/ca-certificates 이하로 사용
admin@ldap-server-test2:~$ sudo certtool --generate-self-signed \
--load-privkey /etc/ssl/private/example_com-ca.pem \
--template /etc/ssl/example_com-ca.info \
--outfile /usr/local/share/ca-certificates/example_com-ca.crt
Generating a self signed certificate...
X.509 Certificate Information:
        Version: 3
        Serial Number (hex): 270cb915316c7a956d85b0e91129ef914a471be7
        Validity:
                Not Before: Mon Aug 12 06:10:36 UTC 2024
                Not After: Thu Aug 10 06:10:36 UTC 2034
        Subject: CN=lyh.local
        Subject Public Key Algorithm: RSA
        Algorithm Security Level: High (4096 bits)
                Modulus (bits 4096):
                        00:d3:ce:5f:3c:e7:45:a6:f8:cd:eb:8c:88:f3:f7:0e
                        11:ae:1e:1a:74:42:a5:0b:46:44:db:95:a5:68:4c:0f
                        e8:16:46:29:f7:99:08:dc:18:87:f5:e0:8b:fd:17:02
                        44:47:dd:98:d8:35:38:5e:a0:a1:a1:d1:fd:6c:35:4e
                        02:93:c2:d0:7c:98:fa:95:5c:04:18:05:33:d8:17:8e
                        4f:0b:13:9e:d5:7d:b4:7b:73:94:10:04:a4:a3:c9:5f
                        ec:b6:39:4e:9b:b7:ac:28:25:25:a4:0b:24:4c:30:f0
                        4c:bd:1d:1b:cb:90:a3:18:15:d6:a6:6c:03:80:88:ce
                        3c:af:56:c9:75:78:17:61:6e:12:3a:02:1e:10:a0:1e
                        44:4e:0e:c7:e1:77:9a:58:a8:7f:ca:05:e1:7f:24:7c
                        1d:ec:aa:e7:85:64:6d:6d:cf:fb:3c:c4:f1:ca:14:67
                        01:59:7a:f2:3a:ec:44:17:ef:e6:06:18:db:bf:7c:73
                        b8:0f:1e:5a:22:85:f7:f7:71:39:40:03:34:2a:7d:19
                        53:a9:b1:d2:62:e9:fa:ef:08:42:6c:d8:ef:c4:77:51
                        78:2f:01:86:55:b6:23:8d:bd:b9:ae:2f:69:90:49:33
                        ef:58:ec:73:5d:0b:60:f7:7f:a4:d8:f5:0d:71:02:b3
                        14:e0:9e:ea:ff:a6:97:bc:0d:4a:87:17:62:23:b5:60
                        5a:f7:e8:6a:0d:b6:dc:8f:bf:b7:61:38:3b:20:23:df
                        49:dc:9b:a6:b4:d2:26:3d:2f:ac:14:21:9a:2c:c6:d0
                        65:d7:61:be:61:e9:f9:be:84:ba:ca:3e:be:ea:d2:c6
                        fc:80:2a:3f:a1:c7:d5:c7:e7:3f:53:3c:ca:f4:4f:54
                        98:df:8b:6f:f5:1f:6d:90:c2:dc:11:02:a2:dd:8f:1e
                        fc:35:c5:cc:b8:6c:81:24:fd:80:88:b3:a1:f9:ce:73
                        32:51:8e:a3:71:fe:a3:b6:f5:49:c5:a2:e3:9c:d3:cd
                        e0:f5:f2:ba:96:e6:0b:44:d4:60:ff:d8:d6:20:cf:eb
                        7b:ed:09:a3:47:0d:eb:12:05:b4:98:0c:da:e3:12:42
                        ba:10:ff:d9:28:ce:e4:db:9a:7d:52:cc:7d:fd:f0:55
                        a0:0d:52:8d:94:72:7e:4d:8b:c1:af:e4:e3:10:63:df
                        3e:04:68:b6:e9:99:5e:23:64:3f:e3:47:33:34:ad:2b
                        ce:b8:b3:31:a4:47:c0:b3:94:a3:66:f1:a3:9e:fd:3c
                        37:18:3f:0f:62:00:23:67:69:81:e4:71:4a:02:3f:d2
                        f4:6e:5c:33:48:b5:b6:42:b9:36:b0:64:6a:4f:23:91
                        ab
                Exponent (bits 24):
                        01:00:01
        Extensions:
                Basic Constraints (critical):
                        Certificate Authority (CA): TRUE
                Key Usage (critical):
                        Certificate signing.
                Subject Key Identifier (not critical):
                        797ec0eccd4c5387f54b3a94a6509af6d30a18cd
Other Information:
        Public Key ID:
                sha1:797ec0eccd4c5387f54b3a94a6509af6d30a18cd
                sha256:b89f39a6b312f30da5922a83200a8828e7257e0088b95998183b2c1d3177f6ac
        Public Key PIN:
                pin-sha256:uJ85prMS8w2lkiqDIAqIKOclfgCIuVmYGDssHTF39qw=


Signing certificate...
여기까지하면 생성은 완료 되었으며 CA파일을 /etc/ssl/certs이하에 경로에서 바로 볼 수 있게 update 해준다.
1
2
3
4
5
6
admin@ldap-server-test2:~$ sudo update-ca-certificates
Updating certificates in /etc/ssl/certs...
rehash: warning: skipping ca-certificates.crt,it does not contain exactly one certificate or CRL
1 added, 0 removed; done.
Running hooks in /etc/ca-certificates/update.d...
done.
2. LDAP 인증서 생성
LDAP server에서 사용할 pem키를 생성한다.
1
2
3
4
5
admin@ldap-server-test2:~$ sudo certtool --generate-privkey \
--bits 2048 \
--outfile /etc/ldap/sasl2/example_com-key.pem
** Note: You may use '--sec-param Medium' instead of '--bits 2048'
Generating a 2048 bit RSA private key..
info 파일에 정보를 넣어 생성한다.
1
2
3
4
5
6
7
8
# 10년 만기
admin@ldap-server-test2:~$ sudo vi /etc/ssl/example_com-key.info
organization = Example Company
cn = example.com
tls_www_server
encryption_key
signing_key
expiration_days = 3650
certtool으로 pem key 파일을 생성한다.
1
2
3
4
5
6
7
8
9
10
11
12
13
14
15
16
17
18
19
20
21
22
23
24
25
26
27
28
29
30
31
32
33
34
35
36
37
38
39
40
41
42
43
44
45
46
47
48
49
50
51
52
53
54
55
56
57
58
59
60
61
62
admin@ldap-server-test2:~$ sudo certtool --generate-certificate \
--load-privkey /etc/ldap/sasl2/example_com-key.pem \
--load-ca-certificate /etc/ssl/certs/exmaple_com-ca.pem \
--load-ca-privkey /etc/ssl/private/example_com-ca.pem \
--template /etc/ssl/example_com-key.info \
--outfile /etc/ldap/sasl2/example_com-cert.pem
Generating a signed certificate...

Expiration time: Thu Aug 10 15:53:39 2034
CA expiration time: Thu Aug 10 15:10:36 2034
Warning: The time set exceeds the CA's expiration time
X.509 Certificate Information:
        Version: 3
        Serial Number (hex): 2a093c573bb03684856fb4817d4a7b5d62c8a0c1
        Validity:
                Not Before: Mon Aug 12 06:53:39 UTC 2024
                Not After: Thu Aug 10 06:53:39 UTC 2034
        Subject: CN=lyh.local,O=LYH
        Subject Public Key Algorithm: RSA
        Algorithm Security Level: Medium (2048 bits)
                Modulus (bits 2048):
                        00:b9:b6:80:df:16:f6:2b:f2:90:47:3c:9f:3e:5f:2e
                        98:61:1c:8d:b4:f7:ee:e5:b3:be:f5:ef:c5:e8:81:92
                        c9:3c:4b:4c:a3:33:aa:d7:9d:e7:a9:7d:67:e9:71:91
                        6f:1e:23:e1:29:28:e1:39:e8:e5:62:50:87:e7:02:13
                        12:52:bd:02:10:dc:21:6c:ee:88:6c:f6:e7:dc:12:eb
                        46:8e:17:f1:a9:14:1e:62:d7:29:96:fc:c6:fa:1d:de
                        5c:0b:5e:36:a3:1e:75:17:40:98:ec:46:51:e8:76:d2
                        b4:67:5c:ef:f6:aa:07:22:b3:ae:fa:00:45:d7:37:1d
                        9a:ab:4d:cc:5f:76:67:7f:53:ed:d2:54:61:46:b1:8f
                        c1:e4:12:42:a8:5c:cd:bb:8e:4d:01:c1:9a:8c:d6:70
                        29:c1:fa:d4:4f:25:d1:f2:a8:a9:32:5a:ad:57:d3:df
                        d7:26:15:15:ba:93:f6:6b:69:2c:d0:db:f7:6c:47:ef
                        e2:30:91:f3:d9:70:51:42:55:e0:56:0b:57:6d:5e:ae
                        27:22:83:82:12:a7:dc:0d:59:4a:23:92:7f:20:f6:1d
                        6c:0b:41:8a:8c:43:72:77:83:a5:d6:a2:dd:40:43:c7
                        fc:c8:ff:f0:57:2e:e6:54:0f:21:db:1a:93:49:ba:66
                        31
                Exponent (bits 24):
                        01:00:01
        Extensions:
                Basic Constraints (critical):
                        Certificate Authority (CA): FALSE
                Key Purpose (not critical):
                        TLS WWW Server.
                Key Usage (critical):
                        Digital signature.
                        Key encipherment.
                Subject Key Identifier (not critical):
                        7f56d82ecf17e9301d4a67f25fa11ecbd9a87aa4
                Authority Key Identifier (not critical):
                        797ec0eccd4c5387f54b3a94a6509af6d30a18cd
Other Information:
        Public Key ID:
                sha1:7f56d82ecf17e9301d4a67f25fa11ecbd9a87aa4
                sha256:91325fe81870ab79317fa535c868f728d623887c0110120444114999bf4c00f0
        Public Key PIN:
                pin-sha256:kTJf6Bhwq3kxf6U1yGj3KNYjiHwBEBIERBFJmb9MAPA=


Signing certificate...
3. 권한 변경 및 검증
LDAP Server에서 바라보려면 openldap의 권한이 필요하다.
위 생성 한 인증서 중 key값에 대해서 권한을 변경 해준다.
1
2
admin@ldap-server-test2:~$ sudo chown openldap:openldap -R /etc/ldap/sasl2
admin@ldap-server-test2:~$ sudo chmod 0640 /etc/ldap/sasl2/example_com-key.pem
CA와 Cert 파일에 대해 검증을 해본다.
1
2
admin@ldap-server-test2:~$ openssl verify -CAfile /etc/ssl/certs/example_com-ca.pem /etc/ldap/sasl2/example_com-cert.pem
/etc/ldap/sasl2/example_com-cert.pem: OK
4. Config 적용
config를 적용하기 위해 ldif script를 짜준다.
기본 schema의 위치는 /etc/ldap/schema 이하에 있다.
1
2
3
4
5
6
7
8
9
10
admin@ldap-server-test2:~$ sudo vi /etc/ldap/schema/01-certs_setting.ldif
dn: cn=config
add: olcTLSCACertificateFile
olcTLSCACertificateFile: /etc/ssl/certs/example_com-ca.pem
-
add: olcTLSCertificateFile
olcTLSCertificateFile: /etc/ldap/sasl2/example_com-cert.pem
-
add: olcTLSCertificateKeyFile
olcTLSCertificateKeyFile: /etc/ldap/sasl2/example_com-key.pem
LDAP Server에 update 해준다.
1
2
3
4
5
6
# lidf로 update
admin@ldap-server-test2:~$ sudo ldapmodify -Y EXTERNAL -H ldapi:/// -f /etc/ldap/schema/01-certs_setting.ldif
SASL/EXTERNAL authentication started
SASL username: gidNumber=0+uidNumber=0,cn=peercred,cn=external,cn=auth
SASL SSF: 0
modifying entry "cn=config"
slapd에 ldaps:// 사용할 수 있도록 설정을 바꿔준다.
1
2
3
4
5
6
7
8
9
10
11
12
13
14
15
16
17
18
19
20
21
22
23
24
25
26
27
28
29
30
31
32
33
34
35
36
37
38
39
40
41
42
43
44
45
46
47
admin@ldap-server-test2:~$ sudo vi /etc/default/slapd
# Default location of the slapd.conf file or slapd.d cn=config directory. If
# empty, use the compiled-in default (/etc/ldap/slapd.d with a fallback to
# /etc/ldap/slapd.conf).
SLAPD_CONF=

# System account to run the slapd server under. If empty the server
# will run as root.
SLAPD_USER="openldap"

# System group to run the slapd server under. If empty the server will
# run in the primary group of its user.
SLAPD_GROUP="openldap"

# Path to the pid file of the slapd server. If not set the init.d script
# will try to figure it out from $SLAPD_CONF (/etc/ldap/slapd.d by
# default)
SLAPD_PIDFILE=

# slapd normally serves ldap only on all TCP-ports 389. slapd can also
# service requests on TCP-port 636 (ldaps) and requests via unix
# sockets.
# Example usage:
# SLAPD_SERVICES="ldap://127.0.0.1:389/ ldaps:/// ldapi:///"
## 해당부분에 ldaps:// 추가
SLAPD_SERVICES="ldap:/// ldapi:/// ldaps:///"

# If SLAPD_NO_START is set, the init script will not start or restart
# slapd (but stop will still work).  Uncomment this if you are
# starting slapd via some other means or if you don't want slapd normally
# started at boot.
#SLAPD_NO_START=1

# If SLAPD_SENTINEL_FILE is set to path to a file and that file exists,
# the init script will not start or restart slapd (but stop will still
# work).  Use this for temporarily disabling startup of slapd (when doing
# maintenance, for example, or through a configuration management system)
# when you don't want to edit a configuration file.
SLAPD_SENTINEL_FILE=/etc/ldap/noslapd

# For Kerberos authentication (via SASL), slapd by default uses the system
# keytab file (/etc/krb5.keytab).  To use a different keytab file,
# uncomment this line and change the path.
#export KRB5_KTNAME=/etc/krb5.keytab

# Additional options to pass to slapd
SLAPD_OPTIONS=""
변경 후 서비스 재시작한다.
1
2
3
4
5
6
7
8
9
10
11
12
13
14
15
16
17
18
19
20
21
22
23
24
25
# 서비스 재시작
admin@ldap-server-test2:~$ sudo systemctl restart slapd.service

# 확인
admin@ldap-server-test2:~$ sudo systemctl status slapd.service
● slapd.service - LSB: OpenLDAP standalone server (Lightweight Directory Access Protocol)
     Loaded: loaded (/etc/init.d/slapd; generated)
    Drop-In: /usr/lib/systemd/system/slapd.service.d
             └─slapd-remain-after-exit.conf
     Active: active (running) since Tue 2024-08-13 13:31:31 KST; 2s ago
       Docs: man:systemd-sysv-generator(8)
    Process: 48714 ExecStart=/etc/init.d/slapd start (code=exited, status=0/SUCCESS)
      Tasks: 3 (limit: 462607)
     Memory: 2.9M
        CPU: 30ms
     CGroup: /system.slice/slapd.service
             └─48720 /usr/sbin/slapd -h "ldap:/// ldapi:/// ldaps:///" -g openldap -u openldap -F /etc/ldap/slapd.d

Aug 13 13:31:15 ldap-server-test2 systemd[1]: Starting LSB: OpenLDAP standalone server (Lightweight Directory Access Protocol)...
Aug 13 13:31:15 ldap-server-test2 slapd[48714]:  * Starting OpenLDAP slapd
Aug 13 13:31:15 ldap-server-test2 slapd[48719]: @(#) $OpenLDAP: slapd 2.5.18+dfsg-0ubuntu0.22.04.2 (Jul 12 2024 21:51:23) $
                                               Ubuntu Developers <ubuntu-devel-discuss@lists.ubuntu.com>
Aug 13 13:31:31 ldap-server-test2 slapd[48720]: slapd starting
Aug 13 13:31:31 ldap-server-test2 slapd[48714]:    ...done.
Aug 13 13:31:31 ldap-server-test2 systemd[1]: Started LSB: OpenLDAP standalone server (Lightweight Directory Access Protocol).
5. hosts 등록 및 테스트
TLS/SSL은 도메인에 적용이 되기 때문에 local에서 확인을 해볼 때는 /etc/hosts에 등록을 해야한다.
1
2
3
4
5
6
7
8
9
# LXC 환경이여서 다음과 같이 출력됨
admin@ldap-server-test2:~$ sudo vi /etc/hosts
127.0.0.1       localhost
::1             localhost ip6-localhost ip6-loopback
ff02::1         ip6-allnodes
ff02::2         ip6-allrouters
# --- BEGIN PVE ---
192.168.0.250 lxc-mgmt.main lxc-mgmt example.com
# --- END PVE ---
등록 후 ldapseach의 명령어를 통해 작동을 확인해본다.
1
2
3
4
5
6
7
8
9
10
11
12
13
14
15
## ldap (no tls/ssl)
admin@ldap-server-test2:~$ ldapsearch -x
# extended LDIF
#
# LDAPv3
# base <dc=example,dc=com> (default) with scope subtree
# filter: (objectclass=*)
# requesting: ALL
#

# search result
search: 2
result: 0 Success

# numResponses: 1
1
2
3
4
5
6
7
8
9
10
11
12
13
14
15
## ldaps (with ssl)
admin@ldap-server-test2:~$ ldapsearch -x -H ldaps://example.com
# extended LDIF
#
# LDAPv3
# base <dc=example,dc=com> (default) with scope subtree
# filter: (objectclass=*)
# requesting: ALL
#

# search result
search: 2
result: 0 Success

# numResponses: 1
1
2
3
4
5
6
7
8
9
10
11
12
13
14
15
## ldap (with tls)
admin@ldap-server-test2:~$ ldapsearch -x -ZZ
# extended LDIF
#
# LDAPv3
# base <dc=example,dc=com> (default) with scope subtree
# filter: (objectclass=*)
# requesting: ALL
#

# search result
search: 2
result: 0 Success

# numResponses: 1
기본적인 사용 방법
하위 방법은 ldaps(TLS)가 아닌 ldap에서 진행 함
기본적인 사용 방법은 순차적으로 deep이라는 계정에 비밀번호를 만든 뒤 docker(993)의 gid를 추가하는 방법으로 진행한다.
추가 이후 ldapdelete로 간단하게 deep 계정에 대해 삭제하는 방법도 적어두었다.
1. ldapsearch
ldapsearch항목을 통해 LDAP 계정에 대해서 검색이 가능하다.
1
2
admin@ldap-server-test2:~$ ldapsearch -x -LLL -H ldap:/// -b dc=example,dc=com dn
dn: dc=example,dc=com
2. ldapadd
ldapadd는 보통 ldif의 파일형식으로 조직(ou), 계정(uid) 등을 추가할 때 사용한다.
아래의 예시는 deep의 계정과 docker 그룹을 추가하는 방법이다.
우선 ldif 파일을 만들어준다.
1
2
3
4
5
6
7
8
9
10
11
12
13
14
15
16
17
18
19
20
21
22
23
24
25
26
27
28
29
30
31
admin@ldap-server-test2:~$ vi create_group_user.ldif
dn: ou=Users,dc=example,dc=com
objectClass: organizationalUnit
ou: Users

dn: ou=Groups,dc=example,dc=com
objectClass: organizationalUnit
ou: Groups

## docker의 대한 group(gid) 추가
dn: cn=docker,ou=Groups,dc=example,dc=com
objectClass: posixGroup
cn: docker
gidNumber: 993

## deep 계정을 Users에 추가
dn: uid=deep,ou=Users,dc=example,dc=com
objectClass: inetOrgPerson
objectClass: posixAccount
objectClass: shadowAccount
uid: deep
sn: test
givenName: deep
cn: account test
displayName: account test
uidNumber: 10000
gidNumber: 10000
userPassword: {CRYPT}x
gecos: test
loginShell: /bin/bash
homeDirectory: /home/deep
파일을 다 만들었으면, ldapadd를 통해 추가해준다.
1
2
3
4
5
6
7
8
9
10
11
12
13
14
15
16
17
18
19
20
21
admin@ldap-server-test2:~$ ldapadd -x -D cn=admin,dc=example,dc=com -W -f create_group_user.ldif
Enter LDAP Password:
adding new entry "ou=Users,dc=example,dc=com"

adding new entry "ou=Groups,dc=example,dc=com"

adding new entry "cn=docker,ou=Groups,dc=example,dc=com"

adding new entry "uid=deep,ou=Users,dc=example,dc=com"

# 확인
admin@ldap-server-test2:~$ ldapsearch -x -LLL -H ldap:/// -b dc=example,dc=com dn
dn: dc=example,dc=com

dn: ou=Users,dc=example,dc=com

dn: ou=Groups,dc=example,dc=com

dn: cn=docker,ou=Groups,dc=example,dc=com

dn: uid=deep,ou=Users,dc=example,dc=com
3. ldappasswd
ldappasswd는 계정의 비밀번호를 변경하거나 추가할 때 사용한다.
1
2
3
4
5
# deep 계정에 대해 비밀번호 추가
admin@ldap-server-test2:~$ ldappasswd -x -D cn=admin,dc=example,dc=com -W -S uid=deep,ou=Users,dc=example,dc=com
New password:
Re-enter new password:
Enter LDAP Password:
4. ldapmodify
ldapmodify는 속성에 대해 변경할 때 사용한다.
아래의 예시는 deep계정에 docker(993)의 gid를 추가하는 방법이다.
1
2
3
4
5
6
7
8
9
10
11
12
13
14
15
16
17
18
19
20
21
22
23
24
25
26
27
28
29
30
31
32
33
34
35
36
# ldif 파일 추가
admin@ldap-server-test2:~$ vi add_deep_to_docker.ldif
dn: cn=docker,ou=Groups,dc=example,dc=com
changetype: modify
add: memberUid
memberUid: deep

# 적용
admin@ldap-server-test2:~$ ldapmodify -x -D cn=admin,dc=example,dc=com -W -f add_deep_to_docker.ldif
Enter LDAP Password:
modifying entry "cn=docker,ou=Groups,dc=example,dc=com"

# 확인
admin@ldap-server-test2:~$ ldapsearch -x -D "cn=admin,dc=example,dc=com" -W -b "cn=docker,ou=Groups,dc=example,dc=com"
Enter LDAP Password:
# extended LDIF
#
# LDAPv3
# base <cn=docker,ou=Groups,dc=example,dc=com> with scope subtree
# filter: (objectclass=*)
# requesting: ALL
#

# docker, Groups, example.com
dn: cn=docker,ou=Groups,dc=example,dc=com
objectClass: posixGroup
cn: docker
gidNumber: 993
memberUid: deep

# search result
search: 2
result: 0 Success

# numResponses: 2
# numEntries: 1
5. ldapdelete
ldapdelete는 조직(ou), 계정(uid) 등 삭제 할 수 있다.
1
2
3
4
5
6
7
8
9
10
11
12
13
# deep 계정 삭제
admin@ldap-server-test2:~$ ldapdelete -D cn=admin,dc=example,dc=com -W -H ldap:/// -x uid=deep,ou=Users,dc=example,dc=com
Enter LDAP Password:

# 확인
admin@ldap-server-test2:~$ ldapsearch -x -LLL -H ldap:/// -b dc=example,dc=com dn
dn: dc=example,dc=com

dn: ou=Users,dc=example,dc=com

dn: ou=Groups,dc=example,dc=com

dn: cn=docker,ou=Groups,dc=example,dc=com
ldapscripts를 이용하여 관리하기
ldapscripts는 위의 명령어들을 더 간편하게 이용할 수 있도록 나온 패키지이다.
Ubuntu official server docs에 나와있으니 참조하여서 진행하면 된다.
https://ubuntu.com/server/docs/how-to-set-up-ldap-users-and-groups
1. 설치 및 세팅
설치는 다음과 같이 한줄로 가능하다.
1
2
3
4
5
6
7
8
9
10
11
12
13
14
15
16
17
18
19
20
21
22
23
24
25
26
27
28
29
30
31
32
33
34
35
36
37
38
39
40
41
42
43
44
45
46
47
48
admin@ldap-server-test2:~$ sudo apt install ldapscripts
Reading package lists... Done
Building dependency tree... Done
Reading state information... Done
The following additional packages will be installed:
  pwgen sharutils
Suggested packages:
  nslcd sharutils-doc bsd-mailx | mailx
The following NEW packages will be installed:
  ldapscripts pwgen sharutils
0 upgraded, 3 newly installed, 0 to remove and 37 not upgraded.
Need to get 202 kB of archives.
After this operation, 755 kB of additional disk space will be used.
Do you want to continue? [Y/n]
Get:1 http://mirror.kakao.com/ubuntu jammy/universe amd64 ldapscripts all 2.0.8-1ubuntu2 [42.5 kB]
Get:2 http://mirror.kakao.com/ubuntu jammy/universe amd64 pwgen amd64 2.08-2build1 [17.4 kB]
Get:3 http://mirror.kakao.com/ubuntu jammy/universe amd64 sharutils amd64 1:4.15.2-5build1 [143 kB]
Fetched 202 kB in 0s (760 kB/s)
Selecting previously unselected package ldapscripts.
(Reading database ... 80937 files and directories currently installed.)
Preparing to unpack .../ldapscripts_2.0.8-1ubuntu2_all.deb ...
Unpacking ldapscripts (2.0.8-1ubuntu2) ...
Selecting previously unselected package pwgen.
Preparing to unpack .../pwgen_2.08-2build1_amd64.deb ...
Unpacking pwgen (2.08-2build1) ...
Selecting previously unselected package sharutils.
Preparing to unpack .../sharutils_1%3a4.15.2-5build1_amd64.deb ...
Unpacking sharutils (1:4.15.2-5build1) ...
Setting up ldapscripts (2.0.8-1ubuntu2) ...
Setting up sharutils (1:4.15.2-5build1) ...
Setting up pwgen (2.08-2build1) ...
Processing triggers for install-info (6.8-4build1) ...
Processing triggers for man-db (2.10.2-1) ...
Scanning processes...
Scanning candidates...
Scanning linux images...

Running kernel seems to be up-to-date.

Restarting services...
Service restarts being deferred:
 systemctl restart packagekit.service

No containers need to be restarted.

No user sessions are running outdated binaries.

No VM guests are running outdated hypervisor (qemu) binaries on this host.
ldapscripts패키지에서 사용되는 파일들은 다음과 같다.
1
2
3
4
5
6
7
8
9
10
11
12
13
14
15
16
17
18
19
20
21
22
23
24
25
26
27
28
29
30
31
32
33
34
35
36
37
38
39
40
41
42
43
44
45
46
47
48
49
50
51
52
53
54
55
56
57
58
59
60
61
62
63
64
65
66
67
68
69
70
71
72
admin@ldap-server-test2:~$ dpkg -L ldapscripts
/.
/etc
/etc/ldapscripts
/etc/ldapscripts/ldapscripts.conf
/etc/ldapscripts/ldapscripts.passwd
/usr
/usr/sbin
/usr/sbin/ldapaddgroup
/usr/sbin/ldapaddmachine
/usr/sbin/ldapadduser
/usr/sbin/ldapaddusertogroup
/usr/sbin/ldapdeletegroup
/usr/sbin/ldapdeletemachine
/usr/sbin/ldapdeleteuser
/usr/sbin/ldapdeleteuserfromgroup
/usr/sbin/ldapfinger
/usr/sbin/ldapgid
/usr/sbin/ldapid
/usr/sbin/ldapinit
/usr/sbin/ldapmodifygroup
/usr/sbin/ldapmodifymachine
/usr/sbin/ldapmodifyuser
/usr/sbin/ldaprenamegroup
/usr/sbin/ldaprenamemachine
/usr/sbin/ldaprenameuser
/usr/sbin/ldapsetpasswd
/usr/sbin/ldapsetprimarygroup
/usr/sbin/lsldap
/usr/share
/usr/share/doc
/usr/share/doc/ldapscripts
/usr/share/doc/ldapscripts/README.Debian
/usr/share/doc/ldapscripts/README.gz
/usr/share/doc/ldapscripts/TODO
/usr/share/doc/ldapscripts/changelog.Debian.gz
/usr/share/doc/ldapscripts/copyright
/usr/share/doc/ldapscripts/examples
/usr/share/doc/ldapscripts/examples/ldapaddgroup.template.sample
/usr/share/doc/ldapscripts/examples/ldapaddmachine.template.sample
/usr/share/doc/ldapscripts/examples/ldapadduser.template.sample
/usr/share/ldapscripts
/usr/share/ldapscripts/runtime
/usr/share/ldapscripts/runtime.debian
/usr/share/lintian
/usr/share/lintian/overrides
/usr/share/lintian/overrides/ldapscripts
/usr/share/man
/usr/share/man/man1
/usr/share/man/man1/ldapaddgroup.1.gz
/usr/share/man/man1/ldapaddmachine.1.gz
/usr/share/man/man1/ldapadduser.1.gz
/usr/share/man/man1/ldapaddusertogroup.1.gz
/usr/share/man/man1/ldapdeletegroup.1.gz
/usr/share/man/man1/ldapdeletemachine.1.gz
/usr/share/man/man1/ldapdeleteuser.1.gz
/usr/share/man/man1/ldapdeleteuserfromgroup.1.gz
/usr/share/man/man1/ldapfinger.1.gz
/usr/share/man/man1/ldapgid.1.gz
/usr/share/man/man1/ldapid.1.gz
/usr/share/man/man1/ldapinit.1.gz
/usr/share/man/man1/ldapmodifygroup.1.gz
/usr/share/man/man1/ldapmodifymachine.1.gz
/usr/share/man/man1/ldapmodifyuser.1.gz
/usr/share/man/man1/ldaprenamegroup.1.gz
/usr/share/man/man1/ldaprenamemachine.1.gz
/usr/share/man/man1/ldaprenameuser.1.gz
/usr/share/man/man1/ldapsetpasswd.1.gz
/usr/share/man/man1/ldapsetprimarygroup.1.gz
/usr/share/man/man1/lsldap.1.gz
/usr/share/man/man5
/usr/share/man/man5/ldapscripts.5.gz
설치가 끝났으면 기본적으로 세팅을 해줘야한다.
conf의 위치는 /etc/ldapscripts이하에 위치 해 있다.
1
2
3
4
5
6
7
8
9
10
11
12
13
14
15
16
17
18
19
20
21
22
23
24
25
26
27
28
29
30
31
32
33
34
35
36
37
38
39
40
41
42
43
44
45
46
47
48
49
50
51
52
53
54
55
56
57
58
59
60
61
62
63
64
65
66
67
68
69
70
71
72
73
74
75
76
77
78
79
80
81
82
83
84
85
86
87
88
89
90
91
92
93
94
95
96
97
98
99
100
101
102
103
104
105
106
107
108
109
110
111
112
113
114
115
116
117
118
119
120
121
122
123
124
125
126
127
128
129
130
131
132
133
134
135
136
137
138
139
140
141
142
143
144
145
146
147
148
149
150
151
152
153
154
155
156
157
158
159
160
161
162
163
164
165
166
167
168
169
admin@ldap-server-test2:~$ vi /etc/ldapscripts/ldapscripts.conf
#  Copyright (C) 2005 Ganaël LAPLANCHE - Linagora
#  Copyright (C) 2006-2017 Ganaël LAPLANCHE
#
#  This program is free software; you can redistribute it and/or
#  modify it under the terms of the GNU General Public License
#  as published by the Free Software Foundation; either version 2
#  of the License, or (at your option) any later version.
#
#  This program is distributed in the hope that it will be useful,
#  but WITHOUT ANY WARRANTY; without even the implied warranty of
#  MERCHANTABILITY or FITNESS FOR A PARTICULAR PURPOSE.  See the
#  GNU General Public License for more details.
#
#  You should have received a copy of the GNU General Public License
#  along with this program; if not, write to the Free Software
#  Foundation, Inc., 59 Temple Place - Suite 330, Boston, MA 02111-1307,
#  USA.

# Note for Debian users:
# On Debian system ldapscripts will try to parse and use nslcd config.
# Look on commented variables and description lines started with DEBIAN.
# But you could override it's values here.


# LDAP server
# DEBIAN: value from /etc/nslcd.conf (uri) is used.
## 변경
SERVER="ldap://localhost"

# Suffixes
# DEBIAN: values from /etc/nslcd.conf (base maps) are used.
## 주석 해제 및 서버에 맞춰 변경
SUFFIX="dc=example,dc=com" # Global suffix
GSUFFIX="ou=Groups"        # Groups ou (just under $SUFFIX)
USUFFIX="ou=Users"         # Users ou (just under $SUFFIX)
#MSUFFIX="ou=Machines"      # Machines ou (just under $SUFFIX)

# Authentication type
# DEBIAN: value from /etc/nslcd.conf (sasl_mech) is used.
# If empty, use simple authentication
# Else, use the value as an SASL authentication mechanism
#SASLAUTH=""
#SASLAUTH="GSSAPI"

# Simple authentication parameters
# The following BIND* parameters are ignored if SASLAUTH is set
## BIND를 admin 계정으로 변경
BINDDN="cn=admin,dc=example,dc=com"
# The following file contains the raw password of the BINDDN
# Create it with something like : echo -n 'secret' > $BINDPWDFILE
# WARNING !!!! Be careful not to make this file world-readable
BINDPWDFILE="/etc/ldapscripts/ldapscripts.passwd"
# For older versions of OpenLDAP, it is still possible to use
# unsecure command-line passwords by defining the following option
# AND commenting the previous one (BINDPWDFILE takes precedence)
#BINDPWD="secret"

# Start with these IDs *if no entry found in LDAP*
GIDSTART="10000" # Group ID
UIDSTART="10000" # User ID
MIDSTART="20000" # Machine ID

# Group membership management
# ObjectCLass used for groups
# Possible values : posixGroup, groupOfNames, groupOfUniqueNames (case-sensitive !)
# Warning : when using groupOf*, be sure to be compliant with RFC 2307bis (AUXILIARY posixGroup).
# Also, do not mix posixGroup and groupOf* entries up in you directory as, within RFC 2307bis,
# the former is a subset of the latter. The ldapscripts wouldn't cope well with this configuration.
GCLASS="posixGroup"   # Leave "posixGroup" here if not sure !
# When using  groupOfNames or groupOfUniqueNames, creating a group requires an initial
# member. Specify it below, you will be able to remove it once groups are populated.
#GDUMMYMEMBER="uid=dummy,$USUFFIX,$SUFFIX"

# User properties
# DEBIAN: values from /etc/adduser.conf are used.
## 홈 디렉토리 생성을 위해 주석 해제
USHELL="/bin/bash"
UHOMES="/home/%u"     # You may use %u for username here
CREATEHOMES="no"      # Create home directories and set rights ?
HOMESKEL="/etc/skel"  # Directory where the skeleton files are located. Ignored if undefined or nonexistant.
HOMEPERMS="755"       # Default permissions for home directories

# User passwords generation
# Command-line used to generate a password for added users.
# You may use %u for username here ; special value "<ask>" will ask for a password interactively
# WARNING    !!!! This is evaluated, everything specified here will be run !
# WARNING(2) !!!! Some systems (Linux) use a blocking /dev/random (waiting for enough entropy).
#                 In this case, consider using /dev/urandom instead.
#PASSWORDGEN="cat /dev/random | LC_ALL=C tr -dc 'a-zA-Z0-9' | head -c8"
#PASSWORDGEN="pwgen"
#PASSWORDGEN="echo changeme"
#PASSWORDGEN="echo %u"
#PASSWORDGEN="<ask>"
PASSWORDGEN="pwgen"

# User passwords recording
# you can keep trace of generated passwords setting PASSWORDFILE and RECORDPASSWORDS
# (useful when performing a massive creation / net rpc vampire)
# WARNING !!!! DO NOT FORGET TO DELETE THE GENERATED FILE WHEN DONE !
# WARNING !!!! DO NOT FORGET TO TURN OFF RECORDING WHEN DONE !
RECORDPASSWORDS="no"
PASSWORDFILE="/var/log/ldapscripts_passwd.log"

# Where to log : local file and/or syslog
LOGTOFILE="yes"
LOGFILE="/var/log/ldapscripts.log"
LOGTOSYSLOG="no"
SYSLOGFACILITY="local4"
SYSLOGLEVEL="info"

# Temporary folder
#TMPDIR="/tmp"

# Various binaries used within the scripts
# Warning : they also use uuencode, date, grep, sed, cut, which...
# Please check they are installed before using these scripts
# Note that many of them should come with your OS

# OpenLDAP client commands
LDAPSEARCHBIN="/usr/bin/ldapsearch"
LDAPADDBIN="/usr/bin/ldapadd"
LDAPDELETEBIN="/usr/bin/ldapdelete"
LDAPMODIFYBIN="/usr/bin/ldapmodify"
LDAPMODRDNBIN="/usr/bin/ldapmodrdn"
LDAPPASSWDBIN="/usr/bin/ldappasswd"

# OpenLDAP client common additional options
# This allows for adding more configuration options to the OpenLDAP clients, e.g. '-ZZ' to enforce TLS
#LDAPBINOPTS="-ZZ"

# OpenLDAP ldapsearch-specific additional options
# The following option disables long-line wrapping (which makes the scripts bug
# when handling long lines). The option was introduced in OpenLDAP 2.4.24, so
# comment it if you are using OpenLDAP < 2.4.24.
LDAPSEARCHOPTS="-o ldif-wrap=no"
# And here is an example to activate paged results
#LDAPSEARCHOPTS="-E pr=500/noprompt"

# Character set conversion : $ICONVCHAR <-> UTF-8
# Comment ICONVBIN to disable UTF-8 conversion
#ICONVBIN="/usr/bin/iconv"
#ICONVCHAR="ISO-8859-15"

# Base64 decoding
# Comment UUDECODEBIN to disable Base64 decoding
#UUDECODEBIN="/usr/bin/uudecode"

# Getent command to use - choose the ones used
# on your system. Leave blank or comment for auto-guess.
# GNU/Linux
#GETENTPWCMD="getent passwd"
#GETENTGRCMD="getent group"
# FreeBSD
#GETENTPWCMD="pw usershow"
#GETENTGRCMD="pw groupshow"
# Auto
GETENTPWCMD=""
GETENTGRCMD=""

# You can specify custom LDIF templates here
# Leave empty to use default templates
# See *.template.sample for default templates
#GTEMPLATE="/path/to/ldapaddgroup.template"
#UTEMPLATE="/path/to/ldapadduser.template"
#MTEMPLATE="/path/to/ldapaddmachine.template"
GTEMPLATE=""
UTEMPLATE=""
MTEMPLATE=""
해당 세팅은 /etc/ldapscripts/ldapscripts.passwd의 파일로 인하여 admin의 비밀번호를 넣게 되어있다.
다음과 같이 escape sequence를 제거하여 넣는다.
1
2
admin@ldap-server-test2:/etc/ldapscripts$ echo -n 'password' | sudo tee /etc/ldapscripts/ldapscripts.passwd
password
2. 계정 생성 및 그룹에 포함하기
위의 기본적인 사용 방법에서 deep 계정을 생성 후 docker(993)에 포함하는 과정을 ldapscripts를 이용하여 진행해본다.
일단, 조직(ou) 같은 경우엔 ldapscripts에는 따로 없어 ldapadd로 추가를 해줘야한다.
1
2
3
4
5
6
7
8
9
10
11
12
13
14
15
16
17
18
19
20
21
22
23
24
# ldif 파일 작성
admin@ldap-server-test2:~$ sudo vi /etc/ldap/schema/02-create_ou.ldif
dn: ou=Users,dc=example,dc=com
objectClass: organizationalUnit
ou: Users

dn: ou=Groups,dc=example,dc=com
objectClass: organizationalUnit
ou: Groups

# ldapadd로 추가
admin@ldap-server-test2:~$ ldapadd -x -D cn=admin,dc=example,dc=com -W -f /etc/ldap/schema/02-create_ou.ldif
Enter LDAP Password:
adding new entry "ou=Users,dc=example,dc=com"

adding new entry "ou=Groups,dc=example,dc=com"

# 확인
admin@ldap-server-test2:~$ ldapsearch -x -LLL -H ldap:/// -b dc=example,dc=com dn
dn: dc=example,dc=com

dn: ou=Users,dc=example,dc=com

dn: ou=Groups,dc=example,dc=com
추가 후 deep계정에 대한 deep(10000)기본 그룹과doker(993)의 그룹을 생성한다.
1
2
3
4
5
6
7
8
9
10
11
admin@ldap-server-test2:~$ sudo ldapaddgroup deep
Successfully added group deep to LDAP

admin@ldap-server-test2:~$ sudo ldapaddgroup docker 993
Successfully added group docker to LDAP

# 확인
admin@ldap-server-test2:~$ sudo ldapgid deep
gid=10000(deep)
admin@ldap-server-test2:~$ sudo ldapgid docker
gid=993(docker)
deep계정을 생성 후 비밀번호도 새로 넣어준다.
1
2
3
4
5
6
7
8
9
10
11
12
13
14
15
16
17
18
19
20
21
22
23
24
25
26
# deep 계정 생성
admin@ldap-server-test2:~$ sudo ldapadduser deep deep
Successfully added user deep to LDAP
Successfully set password for user deep

# deep 비밀번호 생성
admin@ldap-server-test2:~$ sudo ldapsetpasswd deep
Changing password for user uid=deep,ou=Users,dc=example,dc=com
New Password:
Retype New Password:
Successfully set password for user uid=deep,ou=Users,dc=example,dc=com

# 확인
admin@ldap-server-test2:~$ sudo ldapfinger -u deep
dn: uid=deep,ou=Users,dc=example,dc=com
objectClass: account
objectClass: posixAccount
cn: deep
uid: deep
uidNumber: 10000
gidNumber: 10000
homeDirectory: /home/deep
loginShell: /bin/bash
gecos: deep
description: User account
userPassword:: e1NTSEF9U3hRSFJGeDFtRm45VGdLZXlMM1Y2U1hyTXZIbDI1Mk4=
이후 deep계정을 docker(993)권한에 포함해본다.
1
2
3
4
5
6
7
8
9
10
11
12
# deep account to docker group
admin@ldap-server-test2:~$ sudo ldapaddusertogroup deep docker
Successfully added user deep to group cn=docker,ou=Groups,dc=example,dc=com

# 확인
admin@ldap-server-test2:~$ sudo ldapfinger docker
dn: cn=docker,ou=Groups,dc=example,dc=com
objectClass: posixGroup
cn: docker
gidNumber: 993
description: Group account
memberUid: deep
여기까지 하면 위의 ldapmodify항목까지는 끝난 상태와 같다.
3. 계정 및 그룹 삭제
ldapdeleteuser과 ldapdeletegroup를 통하여 간단하게 가능하다.
1
2
3
4
5
6
7
8
9
10
11
12
13
14
15
16
17
18
# 계정 삭제
admin@ldap-server-test2:~$ sudo ldapdeleteuser deep
Deleting user from secondary group: cn=docker,ou=Groups,dc=example,dc=com
Successfully deleted user uid=deep,ou=Users,dc=example,dc=com from LDAP

# 그룹 삭제
admin@ldap-server-test2:~$ sudo ldapdeletegroup deep
Successfully deleted group cn=deep,ou=Groups,dc=example,dc=com from LDAP
admin@ldap-server-test2:~$ sudo ldapdeletegroup docker
Successfully deleted group cn=docker,ou=Groups,dc=example,dc=com from LDAP

# 확인
admin@ldap-server-test2:~$ ldapsearch -x -LLL -H ldap:/// -b dc=example,dc=com dn
dn: dc=example,dc=com

dn: ou=Users,dc=example,dc=com

dn: ou=Groups,dc=example,dc=com
Option
운영에 도움이 되는 script나 기타 필요한 사항을 적어 두었다.
1. LDAP uid 별 password 변경 한 일자 체크
1
2
3
4
5
6
7
8
9
10
11
12
13
#/bin/bash
ldap_account_list=$(ldapsearch -x -LLL -H ldap:/// -b dc=example,dc=com dn "(objectclass=*)" shadowLastChange uid | grep uid | awk '{print $2}' | grep -v uid)

mapfile -t lines <<< ${ldap_account_list}

for line in "${lines[@]}"; do
  if [ -n "$line" ]; then
    today=$(($(date +'%s') / 86400))
    shadow_last_change=$(ldapsearch -x -LLL -H ldap://localhost "uid=${line}" shadowLastChange | awk 'NR==2{print $2}')
    shdw_diff=$((today - shadow_last_change))
    echo -e "Account : $line\t\tPassword change date : $(date "--date=$dt -d -${shdw_diff}day" +%Y-%m-%d)\tDays ago : $shdw_diff"
  fi
done